

Implementing Cloud-Based Per-Title Encoding in the Real World
Bitmovin’s gives developers access to industry-leading codecs and advanced encoding algorithms such as Per-Title. As you saw in the first part of this series, Per-Title Encoding allows you to save money on storage and streaming costs while giving viewers the best perceivable quality for their streaming session.
In part one of this three-part series, I outlined a demo application and discussed a practical high-level architecture to deploy Bitmovin’s encoding service into your own AWS account’s infrastructure using Cloud Connect.
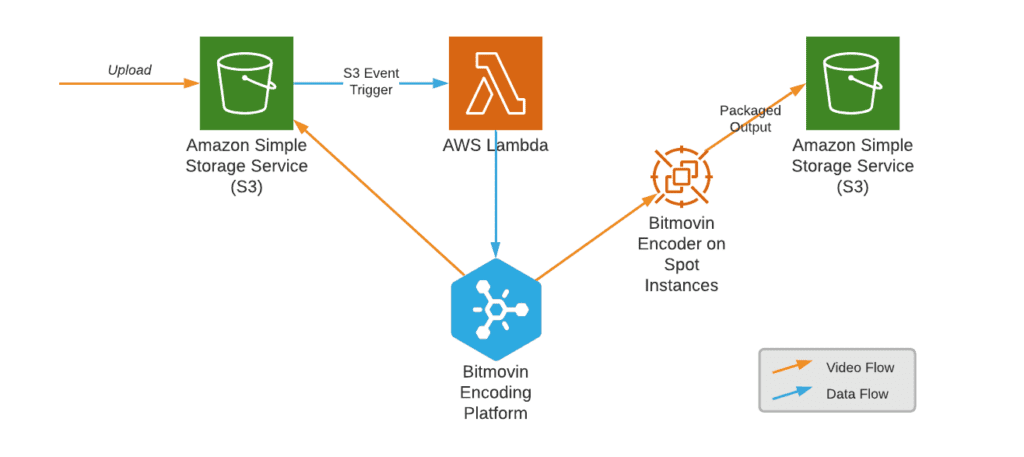
In the application we’re discussing in this blog, users are able to upload videos to an S3 bucket which triggers a Lambda function. The Lambda, in turn, calls the Bitmovin Encoding API to configure and start encoding. The Bitmovin platform then spins up instances in your AWS account to perform the encoding. On completion, playback information and metadata about the encoding is retrieved, stored, ready to be passed through to a front-end application that will let you watch the encoded asset.
In this second part, I’ll talk more about the implementation details for the encoding workflow. I’ll show you first how to enable and configure Cloud Connect, and then how to set up this AWS-based workflow to trigger Bitmovin encodings. If you want to skip ahead, check out part three of this series: Cloud-Based Workflows with AWS: Plugging in the Video Player and Video Analytics
Enabling Cloud Connect for AWS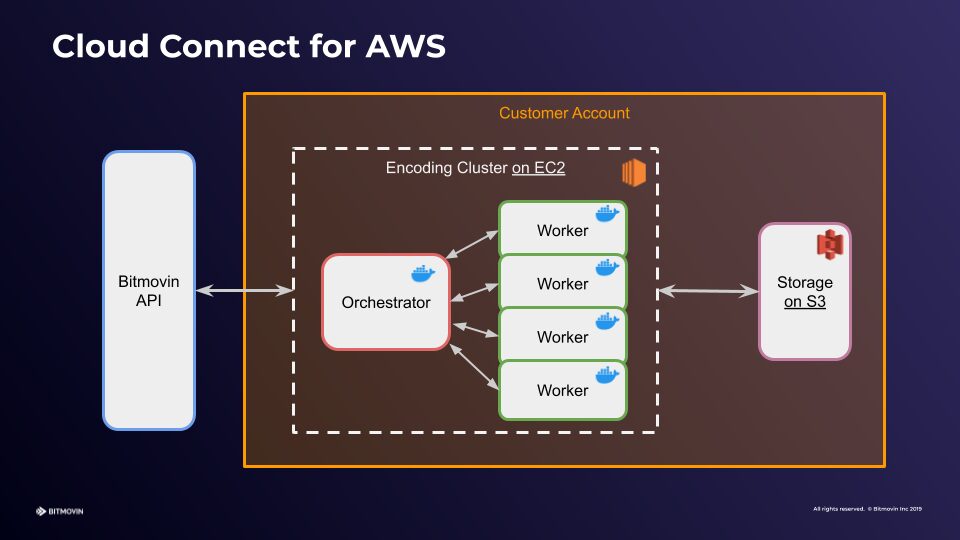
The Bitmovin Cloud Connect feature essentially allows you to perform encodings on virtual infrastructure inside your own AWS account, without any restrictions on the encoding features, codecs, and algorithms that Bitmovin offers.
Let’s first look at how you need to configure things to use Cloud Connect. You will need an AWS account, and a Bitmovin account with Cloud Connect enabled (contact us if you don’t). The configuration process is documented in detail here, but I’ll walk you through the major steps below.
Configuring AWS
Bitmovin will be creating resources within your AWS account, so you’ll need to create an IAM user for it. This user needs to have access to EC2 with applicable permissions. For a prototype, using the `AmazonEC2FullAccess` is sufficient.
Next, you’ll need a Virtual Private Cloud (VPC) and Security Group in your AWS account. You likely already have a default VPC, but if you deleted it, recreate it before proceeding. The security group will make sure that the EC2 instances can communicate with the Bitmovin API and with each other.
Finally, you will likely need to request quota increases from AWS, depending on your expected workloads and concurrency requirements. That’s due to the nature of the Bitmovin encoding process, which splits the video asset into chunks and encodes them in parallel on multiple worker instances.
Configuring Bitmovin
Now that you have a new IAM user and your AWS account configured, you need to create an infrastructure resource on the Bitmovin platform. From the Bitmovin dashboard, go to Encoding > Infrastructure > Add new Infrastructure.
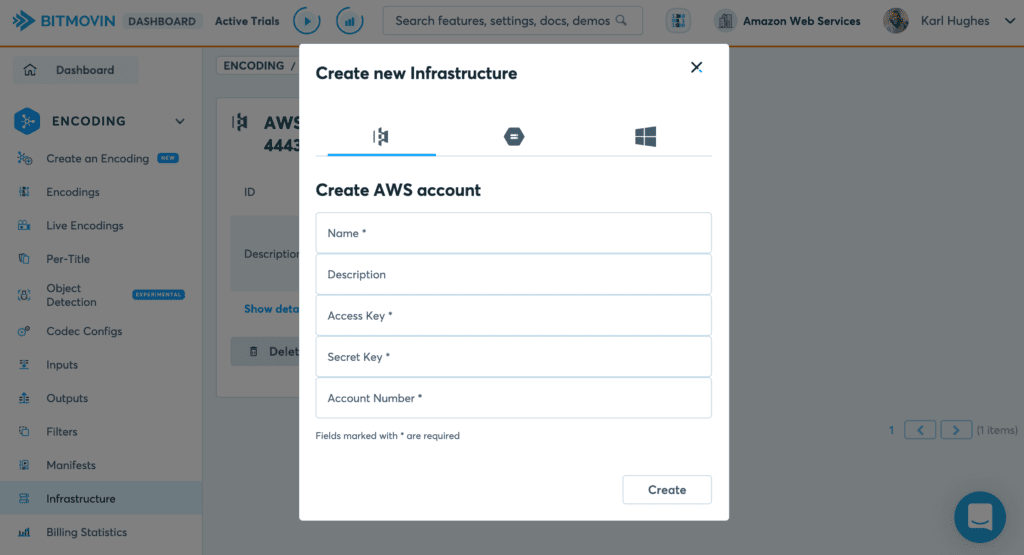
Select AWS at the top and enter your credentials and a name for this infrastructure. Click Create. You now need to specify and configure what AWS region you want to work in. Click Add new Region Settings.
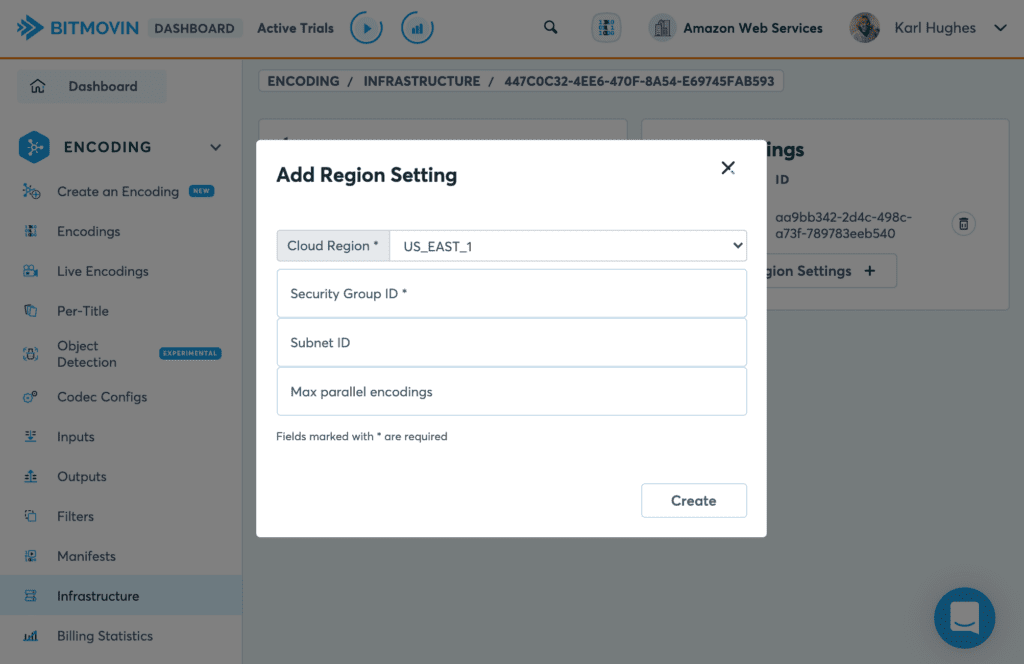
Enter your `security_group_id` and a low number of Max parallel Encodings to start with. You won’t need to set the other settings for simple use cases.
Finally, you need to request access to Bitmovin’s Amazon Machine Images (AMIs). These will be used to create EC2 instances on your AWS account, so let your Bitmovin technical contact know your AWS account number to get access to the AMIs.
This is all you need to do to enable Bitmovin Cloud Connect on your AWS account. Once you start using Cloud Connect, you’ll be able to take advantage of volume pricing discounts, security rules, and configuration options that aren’t available to customers using Bitmovin’s managed encoding service.
Make a note of the ID of the infrastructure. You will need to use it in your encoding configuration later on to instruct Bitmovin to route encodings to your AWS account.
Bitmovin Encoding workflow on AWS
We are now ready to look at the details of the implementation of the workflow. In the first part of this series, I discussed in some detail the architectural choices we made for this demo application. In the remainder of this post, we will focus on the components that interact directly with the Bitmovin encoding platform.
You can also find more details on using the Bitmovin Encoding API in the documentation. Otherwise, read on to see some code samples and more details for setting this up yourself.
Encoding with the Bitmovin API and SDK
I’ll focus first on the AWS Lambda code that calls the Bitmovin API when a new file arrives on S3.
After you’ve set up S3 event notifications to call a Lambda function, you need to write some code that will handle the notification. Lambda supports several common web programming languages and Bitmovin provides SDKs for most of the same ones, but I’ll use the Python SDK for this example. You should be able to adapt these samples to your language of choice.
A Lambda function is configured to invoke a single method in the code. That method is passed an event that contains contextual information and in this case essential information about the S3 bucket and file that triggered the function. We need both to pass into the encoding configuration.
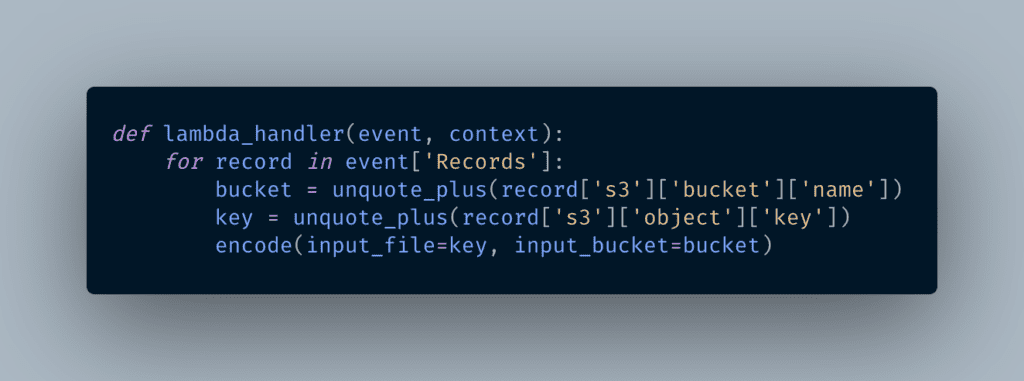
You will previously have configured an S3 Input object on the Bitmovin platform that allows the encoder to grab files from that bucket. For simple workflows with a single watch folder, you would not even need to retrieve the bucket name from the event data, but here we do it to keep the code generic and allow multiple watch folders in different buckets.
The `encode` function will initialise the Bitmovin API with your credentials, which are passed to the Lambda function via environment variables, then retrieves the S3 Input resource that corresponds to the one that triggered the event. It then creates our encoding object.
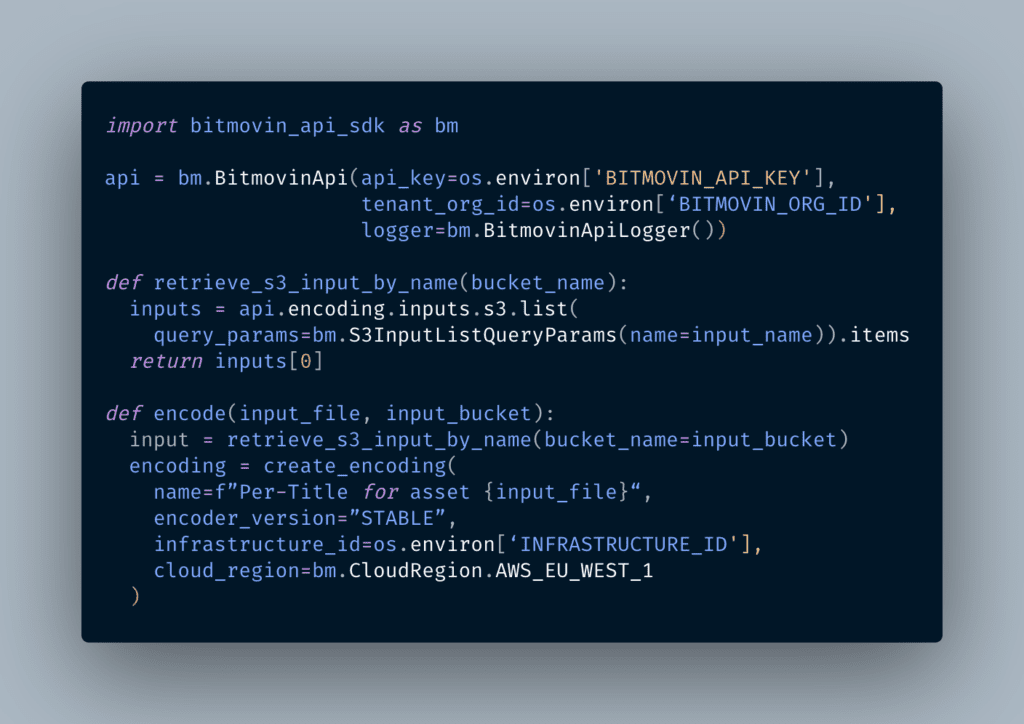
Compared to a “standard” encoding, there is really only one difference when using Cloud Connect: note how we pass the infrastructure ID and AWS region when creating the encoding object. That’s all! From here on, it is a standard Per-Title configuration, which will generate an ABR ladder optimised for that video asset.
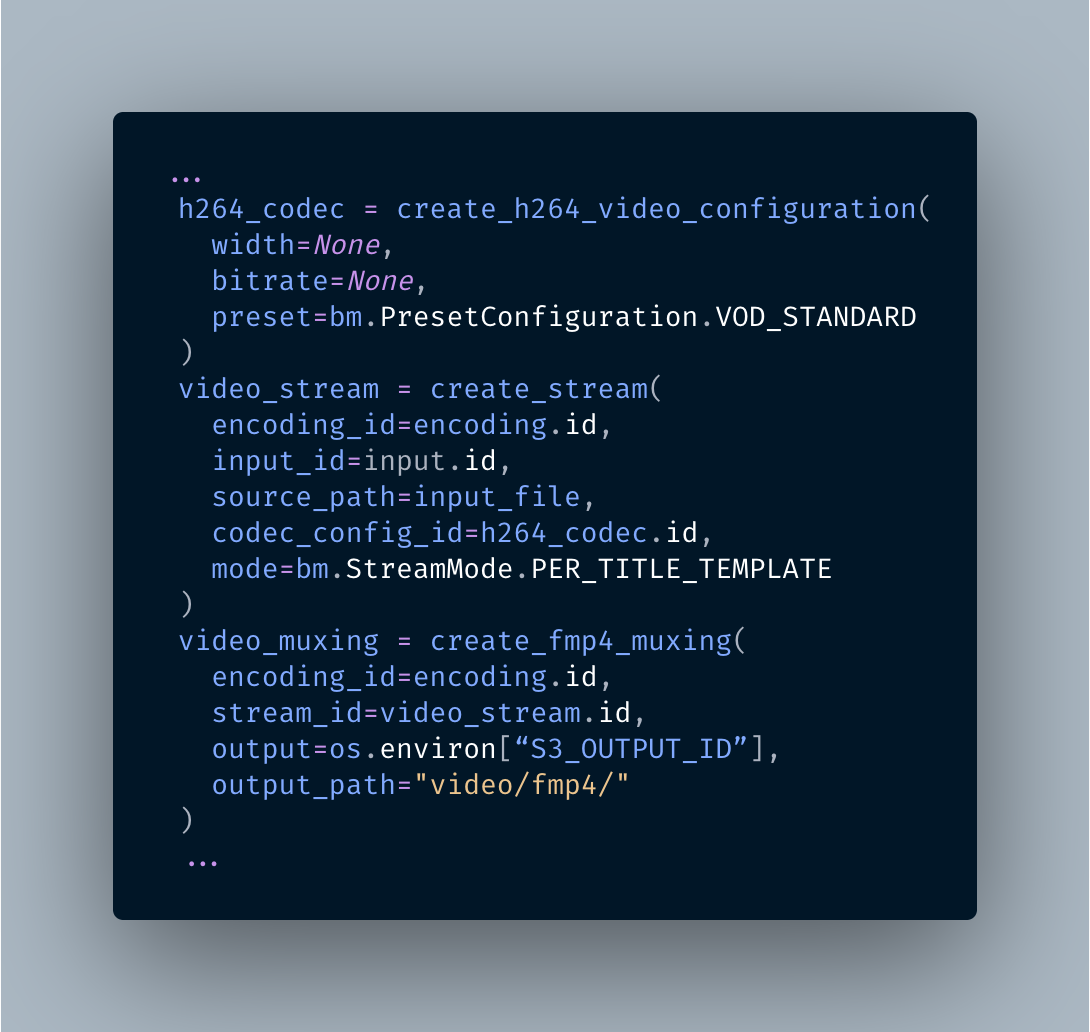
In my code I make use of helper functions that wrap the Bitmovin SDK, to improve the readability of the high-level functions and reusability. I’ve left a lot of detail out because the Bitmovin Python SDK is already well documented. In particular, you can get full details on how to configure Per-Title from our tutorial.
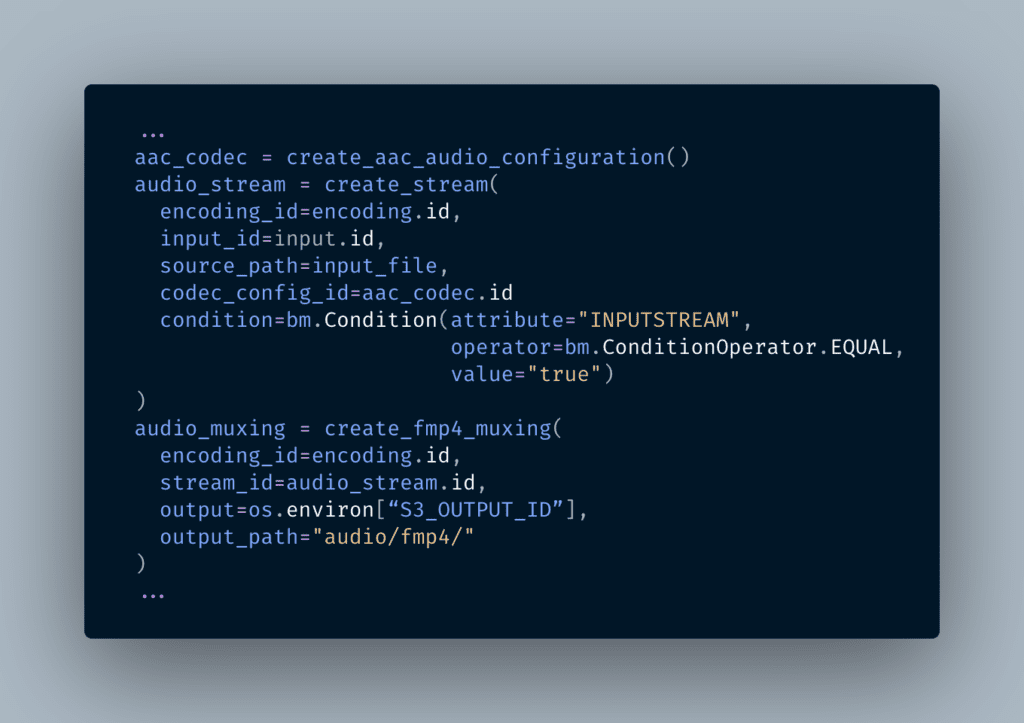
When it comes to audio, I want to make sure that the encoding only attempts to create an audio stream if it’s present in the source. This is easily accomplished with stream conditions:
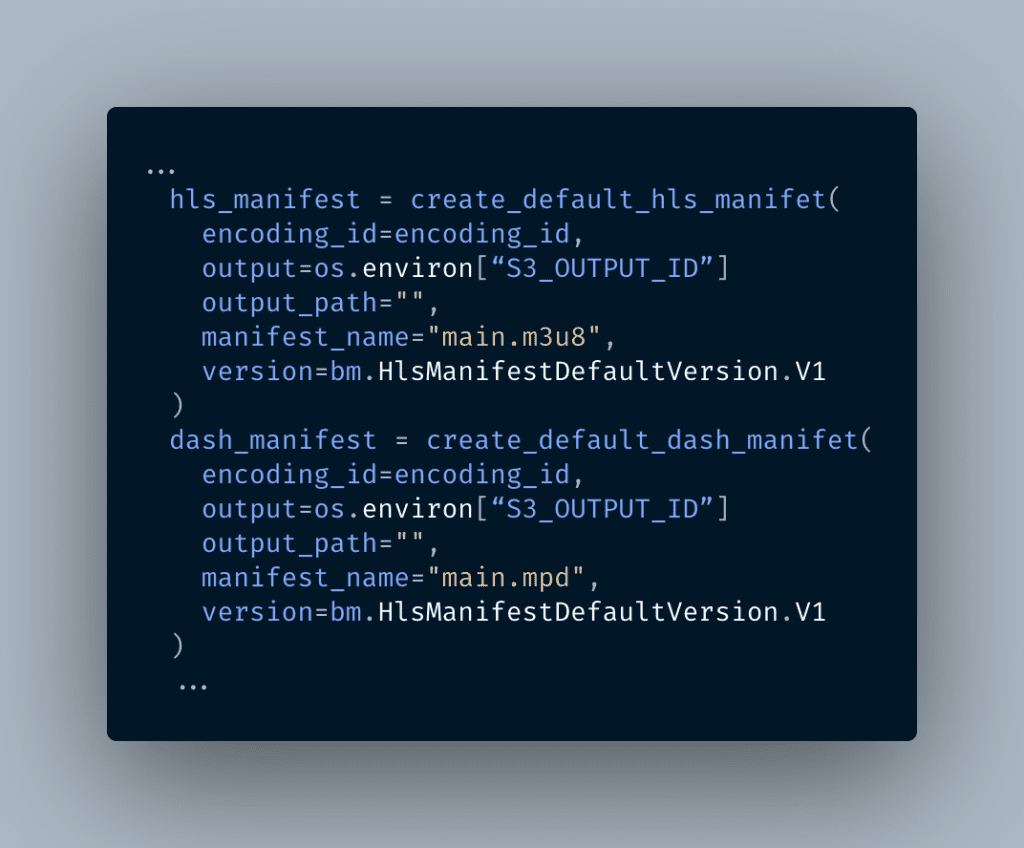
We want to be able to play our video through standard web players, and we therefore also need to create HLS and DASH manifests for them. Since our use case is quite simple, I will make use of Bitmovin’s Default Manifest functionality that will create a standard manifest with very little configuration needed. So the `encode` function continues…
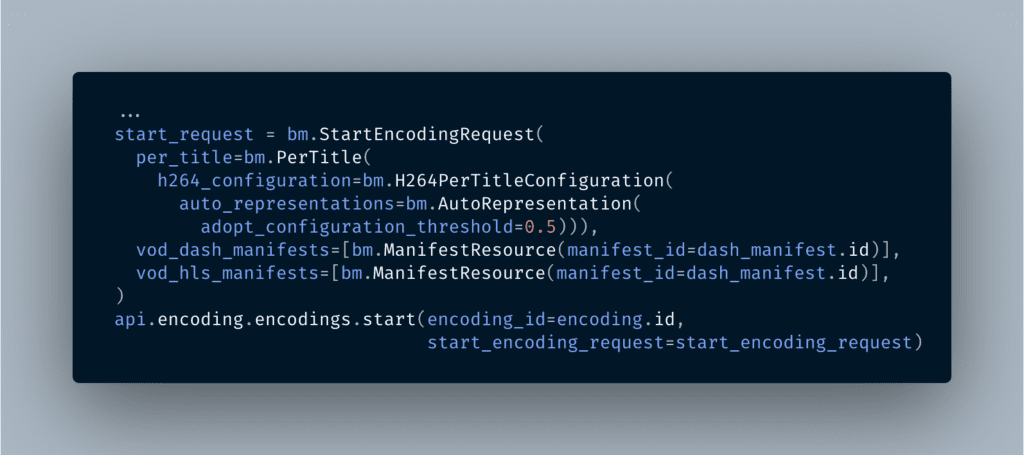
With this done, we are now ready to start the encoding. The start call needs a request payload that instructs the encoder to use the Per-Title algorithm and gives it complete freedom to choose the number, bitrate, and resolution of the renditions to generate for that input asset.
We also let the encoder generate the manifests automatically when the encoding process has completed.
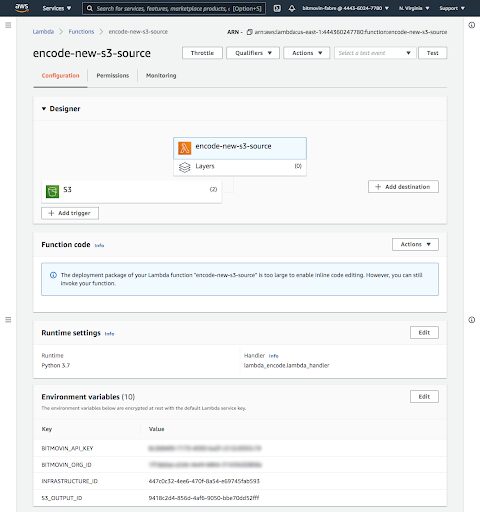
The code is complete, we are now ready to deploy it to our Lambda function. You will need to package it with the Bitmovin Python SDK as dependency. Check the AWS documentation on the various methods that you can use for this deployment. We also need to set the environment variables as appropriate.
At this point, your Lambda will be triggered every time a new video file is added to your S3 bucket. When encoding starts, Bitmovin will split the file, spin up Spot Instances in your AWS account, and begin the encoding process. When the video is finished, it will be saved in the Output S3 bucket you configured. You’ll be able to monitor the encoding process in the Bitmovin dashboard.
Reacting on Completion of the Encoding
In our workflow, we want to gather some information when the encoding is complete to feed to the front-end application. At a minimum, we want to know whether the encoding succeeded, the name of the asset, and the URLs of the manifests. In essence, this performs the same function as an online video platform or content management system would in a more traditional setup.
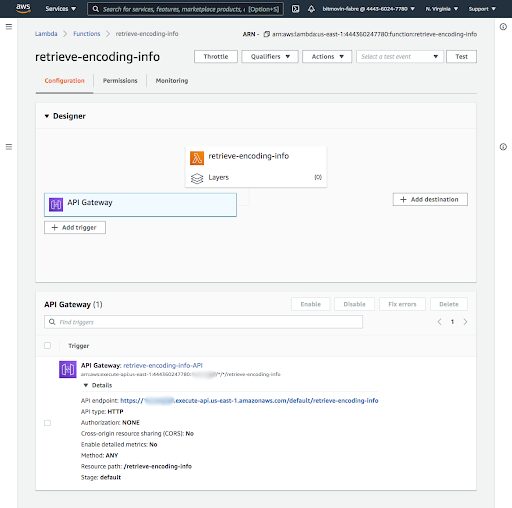
All of this should be automatic, so we will use Lambda again to retrieve that information. To trigger it, the Bitmovin platform will notify a webhook endpoint when the encoding is finished. The Lambda function will retrieve that information and then store it to DynamoDB.

The AWS console makes it easy to create an AWS Lambda function triggered with an HTTP call, through an API Gateway endpoint.
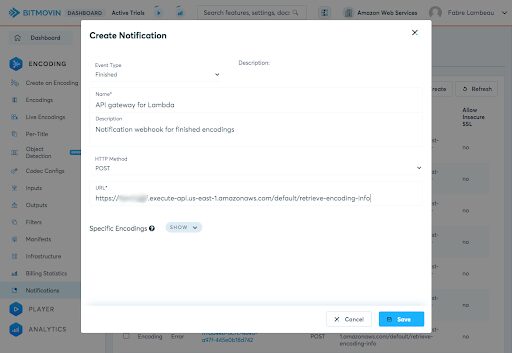
On the Bitmovin side of things, the simpler way to configure a webhook is through the Dashboard. I will create a single “catch-all” webhook that gets triggered for all finished encodings in my Bitmovin account. If I wanted to do it on a per-encoding basis, I could just add a webhook in the encoding configuration instead, in my `encode` function.
Amazon has documentation for setting up DynamoDB, so I won’t cover that here. Instead, I’ll show you how to save data coming in from the completed encoding job. I chose DynamoDB to store the data because it allows you to quickly store unstructured data like this. Great for prototyping during a hackathon!
This second Lambda function has its own code, with its own handler. This time the event data contains the payload from the Bitmovin notification, which contains the encoding ID.
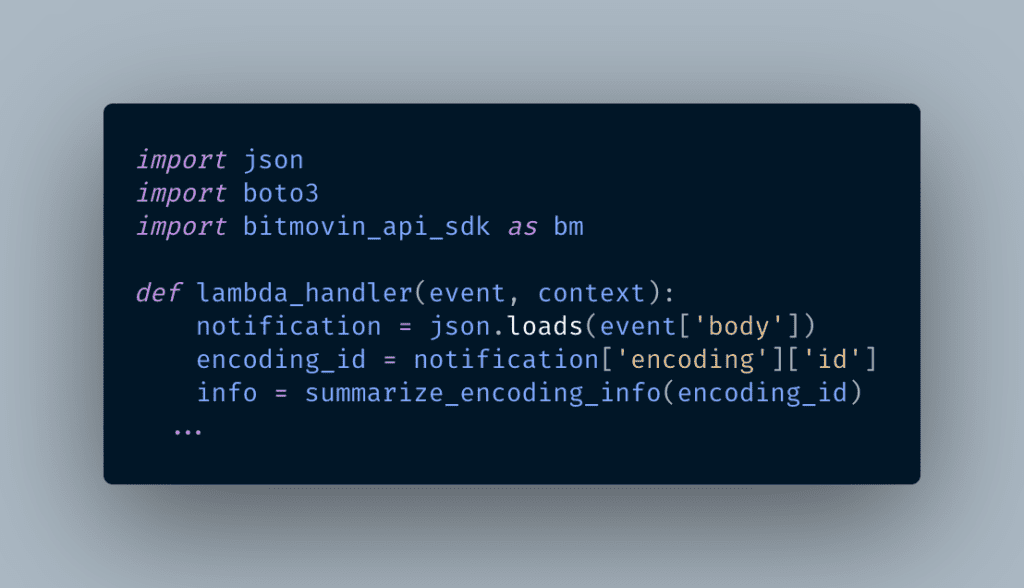
The `summarize_encoding_info` uses the Bitmovin SDK to retrieve the asset name, path, manifest URLs, status, and other useful metadata into a JSON object. I won’t go through the details here, but you will find tips on how to do this in my tutorial on retrieving encoding information.
This function also translates S3 URLs into CloudFront CDN URLs, which the player will use for streaming.
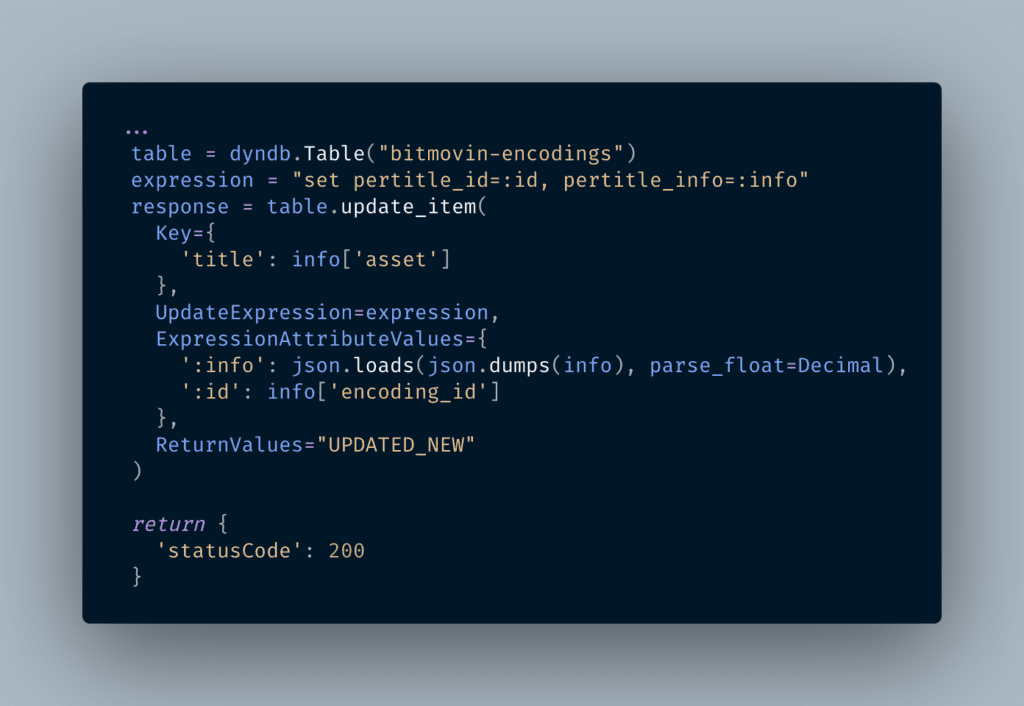
Having extracted that metadata, we save the `info` object to our DynamoDB table (using AWS’ excellent boto3 Python library):
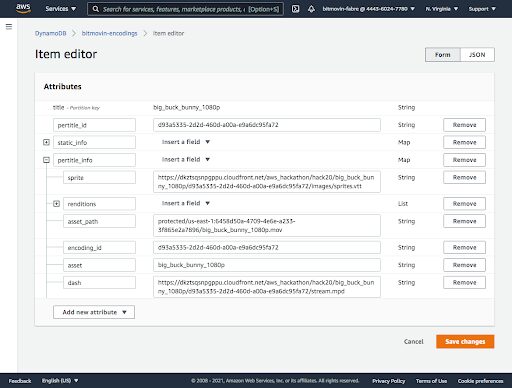
From now on, the data will flow in automatically, and you can use the AWS DynamoDB interface to look up metadata about your encodings.
Multiple encodings
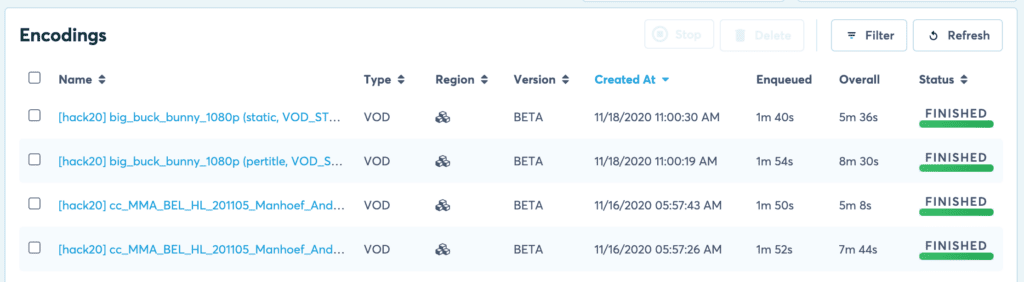
You may remember from part one of our blog series that for the 2020 AWS + Bitmovin hackathon project, we wanted to compare Per-Title and static ladders for our content. The eagle-eyed among you will also have noticed from the previous screenshot that my DynamoDB table does indeed contain 2 sets of info data for the asset.
The code I presented in this post is indeed a simplification, which only creates a single Per-Title ladder, to make it more of a real-life use case. If you wanted to match what we did, the differences are actually quite small:
- The handler for the first Lambda function triggers 2 encodings in parallel.
- A single parameter on the “encode” function offers a switch to allow it to handle the small differences between a static and a Per-Title configuration
- Each encoding is independent and triggers a completion notification individually. The summarize_encoding_info function in the second Lambda determines whether Per-Title was used (which I do through the use of `labels` on the encoding) and updates the corresponding fields in the DynamoDB table
What’s Next?
In this post, you saw how to configure Bitmovin’s Cloud Connect for Amazon Web Services and call Lambda functions each time a video is uploaded and encoded. Using the encoding complete webhook, you can save metadata about each video into DynamoDB.
Going back to the high-level architecture from part one, there’s just one more piece of the application to cover. In the last part of this three-part series, I’ll show you how to implement the Bitmovin Player and gather data about how users are interacting with your content using Bitmovin Analytics.
Finally, if you need help setting up a scalable video encoding pipeline on AWS, reach out to Bitmovin’s team or read more in the encoding API’s documentation.