Introduction
In modern times of software development, the deployment of applications became as important as writing these programs. There are many tools out there that make the whole process of deploying an app to a system very easy and intuitive – Docker is one of them. In certain cases the speed of the deployment is an important factor. We will now take a look at the Docker run command and startup times.
Docker and Containerization
Docker is a well-known service that uses Containerization to deploy applications on Linux and Windows. To understand how Docker works, we must first understand what a container is.
The idea of Containerization is that you take your application and all the dependencies, get a small operating system to run on and put them into an isolated container. This process is called OS-level virtualization, which means that there are multiple instances of operating systems running on the host system all sharing the kernel of the host system.
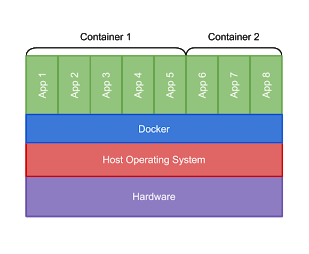
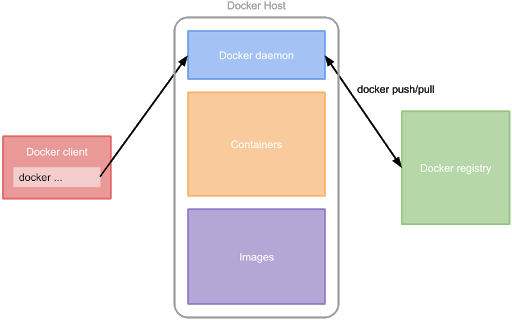
So how is Containerization done by Docker? Docker provides tools to package your application into an image. This image is then stored in a registry, which can either be the official Docker Hub registry, a managed registry hosted by a cloud provider or even your self-hosted registry. Docker uses a client-server architecture. The client sends commands to the server or daemon. The daemon then runs the commands on the Docker host. Once a user issues a docker run myImage command, the client sends the run command to the daemon, which will execute three separate commands consecutively: pull, create, and start. The daemon will look for the image in the storage of the local Docker host. If the image is not available locally, the daemon will look into the configured registry to check if it exists. If that is the case, the daemon will pull the image. Then the daemon will create a container from the image and finally starts it. Our goal is to speed up these steps, launching new containers as fast as possible. For the following tests, we will ignore all improvements that are based on cached layers. All tests assume an empty clean image cache.
Docker create and Docker start
The command names are pretty self-explanatory. The create command creates a container out of an image and the start command starts a container. Looking at the Docker’s code and documentation, there is no way to speed things up – no additional flags that can be set or anything. This leaves us with the pull command to improve the speed.
Docker pull
The docker pull command works as follows: first, the image will be downloaded from the registry, then the compressed layers of the image will be decompressed. This gives us two opportunities to improve the speed of the command. The first is to replace parallel decompressing with a sequential decompression of the image layers. Unfortunately, Docker does not extract images in parallel during decompression. So, the next thing we investigated was which compression/decompression algorithm is used. Docker uses Pigz by default, which is a parallel implementation of gzip. Pigz offers parallel compression but is not capable of parallel decompression. It uses one thread to decompress and three threads to read, write, and check. Since there is no way to change the decompression algorithm, we need to find a way to minimize the decompression time indirectly.
Minimizing pull-time
To minimize the pull time we need to consider a few factors:
- size of the container image (affects download and decompression speed)
- location of the Docker host (affects download speed)
- location of the image registry (affects download speed)
- number of layers (affects decompression speed)
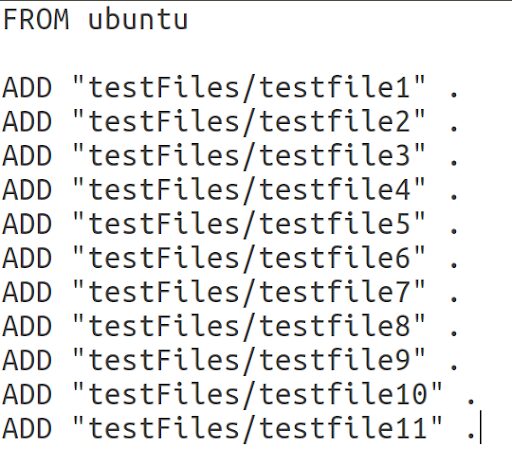
To find out how these factors affect the pull-time, we tested how image sizes affected the time it took to pull images from a registry. The images can be divided into two groups. The first group had only one layer that we increased the size incrementally for each test run. The second group had multiple layers and we increased the layer count for each test run. The Dockerfiles for these images looked like this:

First, we wanted to investigate the difference in the speed of multiple layers versus a single layer. The images were pushed to Docker Hub and then pulled on a cloud-based instance. For each test run, we pulled every image once. To have more expressive results, we did three test runs in total.
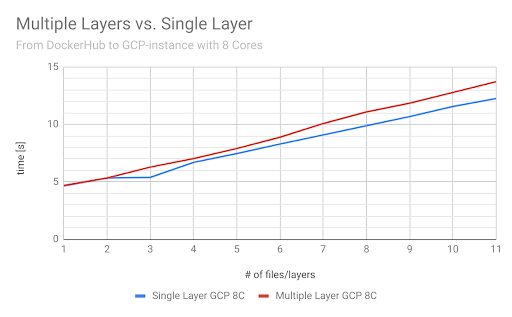
The chart above shows that there was a slight difference between multiple small layers and a single large layer. This was due to decompression. This raised the question: Is there a difference when we use a different registry? To answer this question, we set up a Google Registry repository in Europe and ran tests on our cloud instance. (illustrated below)
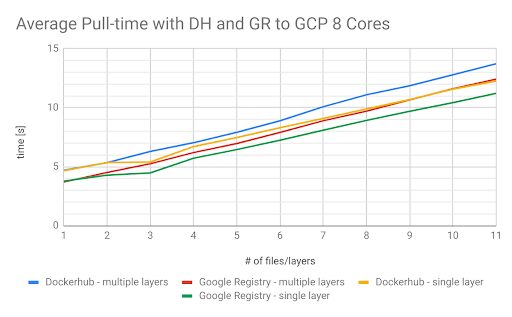
The results were as expected because the Docker Hub registry is US-based. Nevertheless, we managed to decrease the time for pulling an image by another second. With these observations, an alternative approach would be to set up registries in all of our regions and pull from regional registries. This would both reduce the download time and protect our operations from any Docker Hub outages. To validate this idea, we wanted to run a few additional tests involving another VM and another repository both located in the US. We re-ran the tests in all possible configurations. The next test we did was using a cloud instance in the US and pulling from Docker Hub.
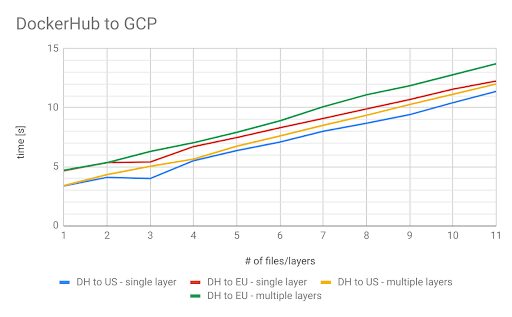
Once again, the results came out as expected. Docker Hub is hosted in the US, thus, geographical distance influences network performance and download speed. The closer we are to the registry the faster the pull command is. But what happens if we use a Google Registry located in the US instead of Docker Hub?
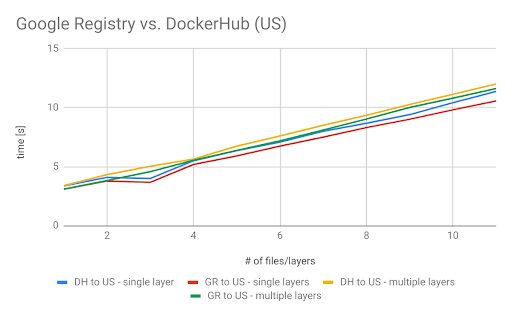
The difference between the measurements is not significant. Unfortunately, Google Container Registry can only be selected on a multi-regional level, but it might be closer to the GCP-instance. However, the results might be different in another instance that is closer to the Docker Hub data center. The problem with Docker Hub remains the same – it’s located in the US. Luckily, the Google Registry can be located in three different multi-regional buckets: US, EU, and Asia. In these multi-regions, the data will be replicated at least twice with geographic redundancy. More information about the geo-redundancy of the Google Registry can be found here. To see the differences when using different Google Registries (GRs), we measured all combinations possible with GRs and GCP-instances. (see below)
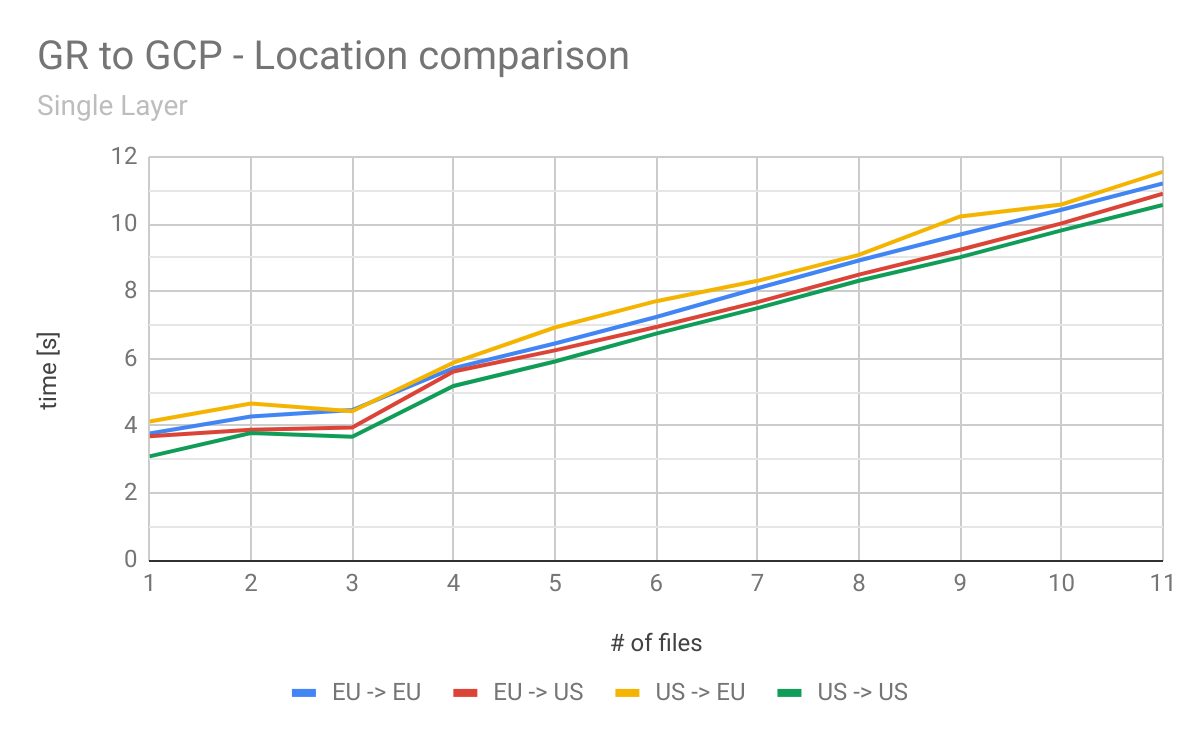
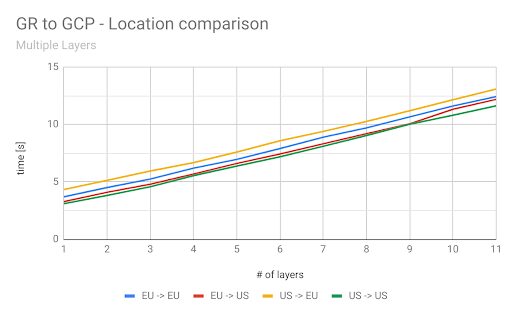
The results differed from our expectations based on previous tests. Somehow, pulling the images from the EU-repository to the US-VM was faster than pulling the images from the EU-repository to the EU-VM. However, pulling from the US-repository to the EU-VM was the slowest combination overall. This test showed that regional repositories are a better approach than a central one. The last test we wanted to try is – is it possible to run our own registry on a GCP-instance? What would be the advantages or disadvantages of running our own registry? For this test, we set up a Docker repository in the same zone as the cloud instance that was pulling from the registry.
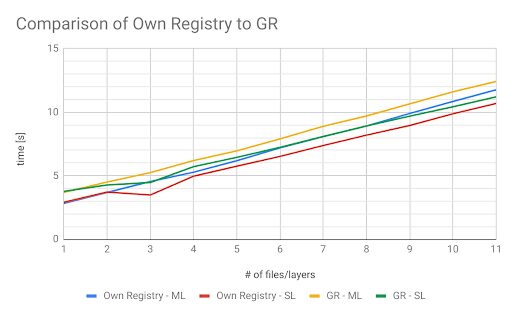
This approach further reduced the time to pull an image by a second. Although this is a nice benefit, we lose the geo-redundancy of the Google Registry as a result. Furthermore, this would mean we would have to set up even more registries for redundancy purposes and DNS Records for all the VMs hosting a container registry; just to be able to push to those additional registries. Lastly, in case the nearest registry fails, retry logic would be needed to find the geographically closest registry and pull the image from there.
Below is an overview of how many seconds we were able to save.
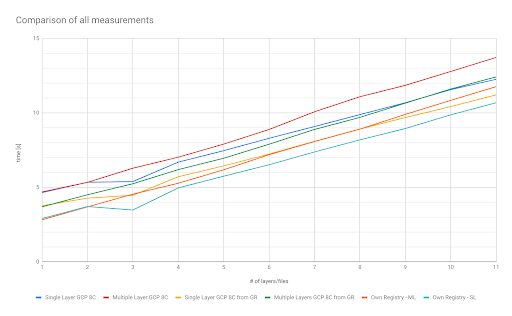
The first thing we can conclude from this chart is that these changes saved us a few seconds and the saved time increases with the image size. Furthermore, all test runs showed that decreasing the number of layers increased the startup time. Multiple things can be used to minimize the number of layers used. Docker offers an experimental feature called squashing, that can be used to put multiple layers into a single one during the image build process.
Conclusion
The improvements not only saved startup time of Docker containers but would also imply that using better-distributed registries we would be geo-redundant and not easily affected by Docker Hub outages as the images could be loaded from another registry.
We also found that the size of the image is the most crucial aspect when trying to decrease pull and startup times of Docker containers. Therefore, the image should be as small as possible. The following steps can be taken to improve the pull-time:
- Use GR with a GCP-instance (8 Cores) in the same region: ~ 1 sec / 100 MB
- Setup your own Registry in the same Region: ~ 0.7 sec / 100 MB
- Having all data in a single layer will decrease the decompression time, meaning the image will be available sooner
With those changes a speed-up of around 1.7 seconds per 100 MB of the size of the Docker Image is possible.
Did you enjoy this post? Then check out some of our other great content:
[BLOG] Intern Blog Series – Finding Memory Leaks in Java Microservices:
[BLOG] Everything you need to know about DRM
[BLOG] State of Compression Standards: VVC
[E-Book] Video Developer Report 2019


