
![]()
In November 2015 Microsoft open sourced the .NET framework to make it cross-platform available on Windows, Linux and Mac OS, perhaps making it a very interesting API Client for your next project.
We already offer a great range of API clients for our encoding service for adaptive streaming video, including node.js, ruby, javascript, php, python, java, and we are constantly adding new ones based on customer requests. As many of our customers use the .NET framework in their backend, this API client was the next logical step. The fact that Microsoft open sourced the .NET framework last November (2015), to make it cross-platform available, makes this API useful to a much broader range of developers. C# video streaming just got easier for everyone!
Bitmovin C# API Client for .NET
The Bitmovin C# API Client for .NET can be used on Windows with the .NET framework, on Linux with the Mono framework, and on OS X with the Mono framework.
You can easily install the API client through NuGet. NuGet is an extension for Visual Studio which allows you to search, install, uninstall and update external packages in your projects and solutions. It is pre-installed on the more recent versions of Visual Studio, but you can also add NuGet directly by downloading it from nuget.org.
Afterwards you can install the API client with the Package Manager Console:
Install-Package bitcodin-dotnet -Version 1.0.0
Detailed information on how to find, install, remove, and update NuGet packages using the Manage NuGet Packages dialog box can be found at docs.nuget.org.
Get Started
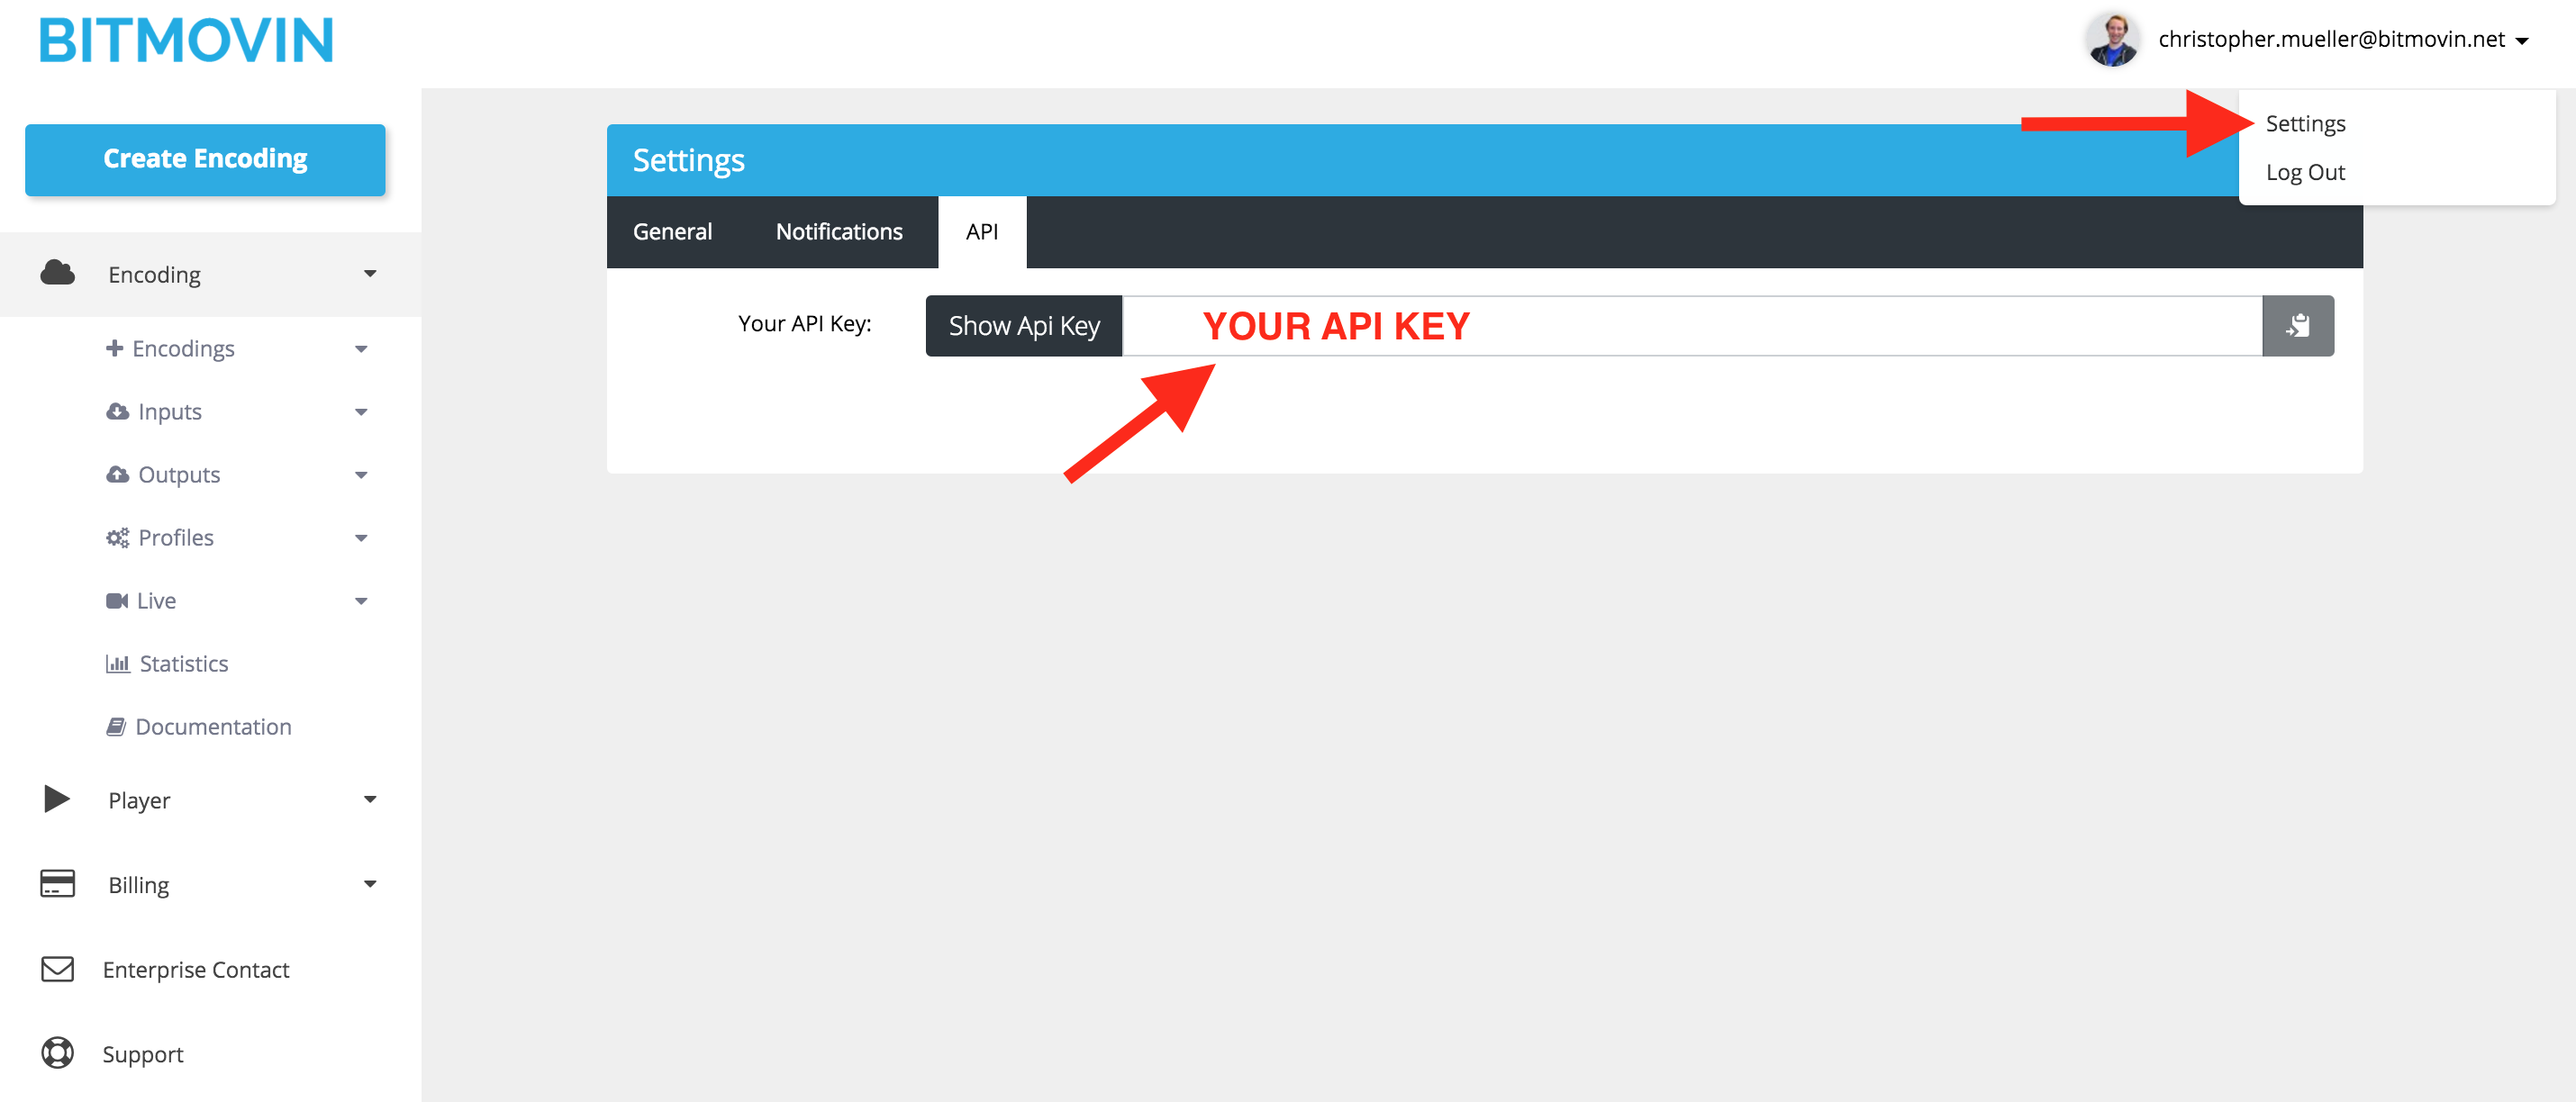
Before you can start you need to get your Bitmovin API-Key from the web portal.
Afterwards it is very simple to get up and running. Simply instantiate the Bitmovin API as shown in the following:
using com.bitmovin.bitcodin.Api;
public static class BitcodinApiTest
{
  public static void Run()
  {
    const string apiKey = "YOUR_API_KEY";
    var bitApi = new BitcodinApi(apiKey);
  }
}
You can also find a lot of examples that show how you can use our encoding service in the example folder packaged with the client. It’s always best to start with an example as a basis for your implementation so you can start with a working model and just need to modify what is specific to your use case.
Encoding Example
The following example shows how you can encode a video from your AWS S3 bucket into MPEG-DASH and HLS. The first step is to create an input in our encoding service. An input is a video that you want to encode to MPEG-DASH and HLS. In this example the input video is coming from AWS S3. You just have to enter your AccessKey, SecretKey, Bucket name, Region and ObjectKey which is the path to the video file in the Bucket in lines 12 to 16. Beside that you need to set the correct permissions on your bucket so that we are allowed to access your input video file. The following permissions need to be set on the input bucket:
{
    "Version": "2012-10-17",
    "Statement": [
        {
            "Effect": "Allow",
            "Action": [
                "s3:GetObject"
            ],
            "Resource": [
                "arn:aws:s3:::YOUR_BUCKET_NAME/*"
            ]
        },
        {
            "Effect": "Allow",
            "Action": [
                "s3:ListBucket",
                "s3:GetBucketLocation"
            ],
            "Resource": [
                "arn:aws:s3:::YOUR_BUCKET_NAME"
            ]
        }
    ]
}
If everything is inserted correctly you should see that the API client was able to create your input and it should write the following on the console “Created Input: your-video.mp4”.
public static class CreateS3Job
{
    public static void Run()
    {
      /* Create BitcodinApi */
      const string apiKey = "YOUR_API_KEY";
      var bitApi = new BitcodinApi(apiKey);
      /* Create URL Input */
      var s3InputConfig = new S3InputConfig
      {
        AccessKey = "ACCESSKEY",
        SecretKey = "SECRETKEY",
        Bucket = "BUCKET",
        Region = "REGION",
        ObjectKey = "path/to/file.ext"
      };
      Input input;
      try
      {
        input = bitApi.CreateInput(s3InputConfig);
      }
      catch (BitcodinApiException e)
      {
        Console.WriteLine("Could not create input: " + e);
        return;
      }
      Console.WriteLine("Created Input: " + input.Filename);
The next step is that you create your encoding profile. An encoding profile describes multiple resolutions and bitrates that you want to create from your source file for adaptive streaming. In this example we create 3 resolutions and bitrates from your input video, i.e., 1920×[email protected], 1280×[email protected] and 854×[email protected]. We are using the H.264 video codec in that profile with the MAIN profile and our PREMIUM encoder which is the default encoder. If a video file is not working with the PREMIUM encoder you should switch to the STANDARD encoder.
      /* Create EncodingProfile */
      var videoConfig1 = new VideoStreamConfig
      {
        Bitrate = 4800000,
        Width = 1920,
        Height = 1080,
        Profile = Profile.MAIN,
        Preset = Preset.PREMIUM
      };
      var videoConfig2 = new VideoStreamConfig
      {
        Bitrate = 2400000,
        Width = 1280,
        Height = 720,
        Profile = Profile.MAIN,
        Preset = Preset.PREMIUM
      };
      var videoConfig3 = new VideoStreamConfig
      {
        Bitrate = 1200000,
        Width = 854,
        Height = 480,
        Profile = Profile.MAIN,
        Preset = Preset.PREMIUM
      };
      var encodingProfileConfig = new EncodingProfileConfig { Name = "DotNetTestProfile" };
      encodingProfileConfig.VideoStreamConfigs.Add(videoConfig1);
      encodingProfileConfig.VideoStreamConfigs.Add(videoConfig2);
      encodingProfileConfig.VideoStreamConfigs.Add(videoConfig3);
We also add one audio quality to the output encoding with 128Kbps. It is also possible to add multiple audio qualities with different bitrates in adaptive streaming but this is typically not needed as audio with 128Kbps already sounds quite good. Lower bitrates make sense for some use cases but usually it’s enough to provide one as the video bitrates are much higher anyway and audio bitrate does not make much of a difference in the whole system.
      var audioStreamConfig = new AudioStreamConfig
      {
        DefaultStreamId = 0,
        Bitrate = 128000
      };
      encodingProfileConfig.AudioStreamConfigs.Add(audioStreamConfig);
      EncodingProfile encodingProfile;
      try
      {
        encodingProfile = bitApi.CreateEncodingProfile(encodingProfileConfig);
      }
      catch (BitcodinApiException e)
      {
        Console.WriteLine("Could not create encoding profile: " + e);
        return;
      }
The last step is that we submit this encoding job to the system and wait until the encoding is finished. Afterwards you could transfer your encoded assets back to your AWS S3 storage. This could be done through our API or through the web interface, but make sure that you set the right permissions on your bucket so that we are allowed to write files into it.
      /* Create Job */
      var jobConfig = new JobConfig
      {
        EncodingProfileId = encodingProfile.EncodingProfileId,
        InputId = input.InputId
      };
      jobConfig.ManifestTypes.Add(ManifestType.MPEG_DASH_MPD);
      jobConfig.ManifestTypes.Add(ManifestType.HLS_M3U8);
      Job job;
      try
      {
        job = bitApi.CreateJob(jobConfig);
      }
      catch (BitcodinApiException e)
      {
        Console.WriteLine("Could not create job: " + e);
        return;
      }
      JobDetails jobDetails;
      do
      {
        try
        {
          jobDetails = bitApi.GetJobDetails(job.JobId);
          Console.WriteLine("Status: " + jobDetails.JobStatus +
                            " - Enqueued Duration: " + jobDetails.EnqueueDuration + "s" +
                            " - Realtime Factor: " + jobDetails.RealtimeFactor +
                            " - Encoded Duration: " + jobDetails.EncodedDuration + "s" +
                            " - Output: " + jobDetails.BytesWritten / (double)1024 / 1024 + "MB");
        }
        catch (BitcodinApiException)
        {
          Console.WriteLine("Could not get any job details");
          return;
        }
        if (jobDetails.JobStatus == JobStatus.ERROR)
        {
          Console.WriteLine("Error during transcoding");
          return;
        }
        Thread.Sleep(2000);
      } while (jobDetails.JobStatus != JobStatus.FINISHED);
      Console.WriteLine("Job with ID " + job.JobId + " finished successfully!");
    }
}
After everything is finished you could follow our tutorial how you setup adaptive streaming with AWS S3 and CloudFront. It shows you how to setup the CDN and deploy our player so that you can efficiently stream your assets to your users in the best possible quality, creating a reliable C# video streaming workflow.
Whats Next?
We are constantly adding new API clients and improving/extending the ones that are available. If you are missing an important language, please reach out to us so that we can put it onto our list. Beside that, we are working hard on our unified Bitmovin API that incorporates the encoding and our player as well as a lot of new features and functionalities, so stay tuned.