
Streaming video over the web or on connected TV devices are two main ways viewers watch their favorite content. To engage those audiences and provide them with the best experience, development teams typically choose to deploy an HTML5-based video player (see our latest blog on top HTML5 video players) that can be tailored to specific device/browser requirements. In order to customize this <video> element, HTML5 video attributes are implemented to enable users to play and pause videos, change the language, enable subtitles, and so much more. Since HTML5 is the primary way to embed video content on web-based platforms and applications, whether you’re a seasoned developer or just getting started, we have detailed everything you need to know below on video tags in HTML5.
In our definitive 2024 HTML5 Video Tags guide, we will provide you with a thorough understanding of it, covering all aspects, from the basics to more advanced functionalities. This includes what an HTML5 video element and video tag are, how they work, and how they can be customized through the most used HTML5 video attributes.
What is the HTML Video Element?
The HTML Video Element refers to the code that highlights the video tag, its attributes, and the embedded video content on web pages, representing the markup, functionality, and associated behaviors. The element supports multiple video formats and offers various attributes for customization and capabilities to ensure responsiveness and accessibility. It is commonly used interchangeably with video tags; however, it encompasses each part of the HTML video element created by the video tag in the Document Object Model (DOM).
What are media tags in HTML5?
In HTML5, “media tags” refer to the elements introduced to embed and control different types of media content, such as audio files and video files, directly within HTML documents.
An example of how this looks like for Video and Audio:
<video controls>
   <source src="movie.mp4" type="video/mp4">
   <source src="movie.ogg" type="video/ogg">
   Your browser does not support the video tag.
</video>
<audio controls>
   <source src="audio.mp3" type="audio/mpeg">
   <source src="audio.ogg" type="audio/ogg">
   Your browser does not support the audio element.
</audio>
What is the video tag in HTML5?
Part of the media tag, the HTML5 video tag, represented by the <video> tag in HTML5, is a feature that enables playing video files. It provides native support for video playback in modern web browsers without requiring external plugins or players. Utilizing this element makes incorporating video content into websites easy, enhancing user experience and web design flexibility.
How do you embed a video in HTML5?
To embed videos in HTML, you’ll need to use the <video> tag inside the body of the HTML document to showcase the HTML elements. Here’s an example of how the code might look:
<video width="1920" height="1080">
 <source src="movie.mp4" type="video/mp4">
 <source src="movie.ogg" type="video/ogg">
 Your browser does not support the video tag.
</video>
Here’s a breakdown of the different factors within that code snippet:
- Open the code snippet with <video>, and if you know the <width> and <height>, you can set that as well.
- Specify where the source file for the video can be accessed by using the src attribute. Here, you can add another format for the same video using the <source> tag to specify where the video can be pulled. This is useful for cross-browser compatibility, as all formats supported aren’t the same across all browsers and devices.
- Add the “Your browser does not support this video type” to make sure your viewer knows the issue is not on your end but on their browser or device compatibility with HTML5.
- Finally, close the <video> Tag by placing a / before “video” to finish the code snippet.
What are the problems with the HTML5 Video Tag?
Even though the <video> tag streamlines video streaming on browsers and web-based devices, it also has some limitations that can affect playback and the user and developer experience. These issues are:
- Browser Compatibility Issues and Codec Support
- Different teams and companies own each browser, meaning they all have different priorities they are focusing on when it comes to supporting specific formats and codecs. This may ultimately lead to playback issues if a browser doesn’t support the format you’re using.
- Performance issues and no Adaptive streaming
- High-resolution videos can be very heavy on a user’s bandwidth, and depending on the browser, the video tag doesn’t natively support adaptive bitrate streaming protocols like HLS and MPEG-DASH (unless it is Safari, which natively supports HLS), so it can’t adapt to a user’s network environment. However, by implementing Media Source Extensions (MSE) alongside the <video> tag, a video player can gain the capability to adapt the video’s streaming quality to network environments dynamically. Check out our other blog on Adaptive bitrate streaming (ABR). Also, if you want to ensure your stream functions well, see how it performs by testing it on our Player demo.
- Content protection
- Certain content needs protection that HTML5 just can’t provide since it isn’t natively supported. A video player with a DRM integrated or other content protection capabilities is necessary to protect it.
- No unified user interface
- Even though every major browser supports the <video> tag for HTML5, as each browser is different, so is the experience users will have when streaming video, which can lead to frustration and abandonment.
Additional features of video players like thumbnail seeking or multi-audio are usually not supported; when it comes to subtitle support, the format a browser supports may vary and might not be what you have for your content.
Which browsers support video in HTML5?
As HTML is the standard for web-based video playback, every major modern desktop and mobile browser supports HTML5 and the usage of the video tag, including:
Desktop Browsers:
- Google Chrome
- Mozilla Firefox
- Apple Safari
- Microsoft Edge
- Opera
- Samsung Internet
- Vivaldi
- Brave
Mobile Browsers:
- Google Chrome for Android/iOS
- Safari for iOS
- Firefox for Android/iOS:
- Samsung Internet Browser
- Microsoft Edge for Android/iOS
- Opera Mobile/Opera Mini
- UC Browser
Browser-based TV, STB, and gaming Console apps:
- Samsung Tizen
- LG WebOS
- PlayStation 4 & 5
- Comcast X1 STBs
- Sky Q STBs
- Xbox One Series
- Vizio
- Panasonic
- Hisense
What is a video format for HTML5, and which are supported by browsers?
An HTML5 video format is the file type used within a <video> tag as an option when listing a source. Unlike previous HTML versions where external plugins like Flash were needed for video streaming, HTML5 supports video playback natively within the browser. However, depending on the browser, not all video formats are supported, so it’s best to provide a video element with multiple formats for cross-browser compatibility, or users may experience errors when streaming. This can be due to limited royalty fees or just limited interest.
An example of how this would look within the code is:
<video width="1920" height="1080">
   <source src="movie.mp4" type="video/mp4">
   <source src="movie.webm" type="video/webm">
   <source src="movie.ogg" type="video/ogg">
   Your browser does not support the video tag.
</video>
The most commonly supported HTML5 video formats across different browsers are:
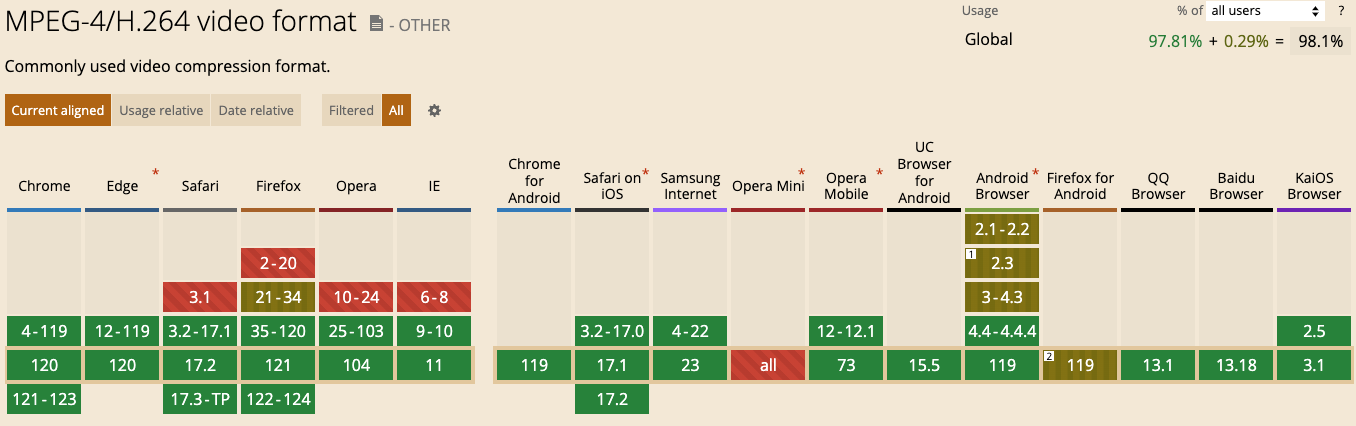
- MP4
- Most widely supported and compatible format across major browsers
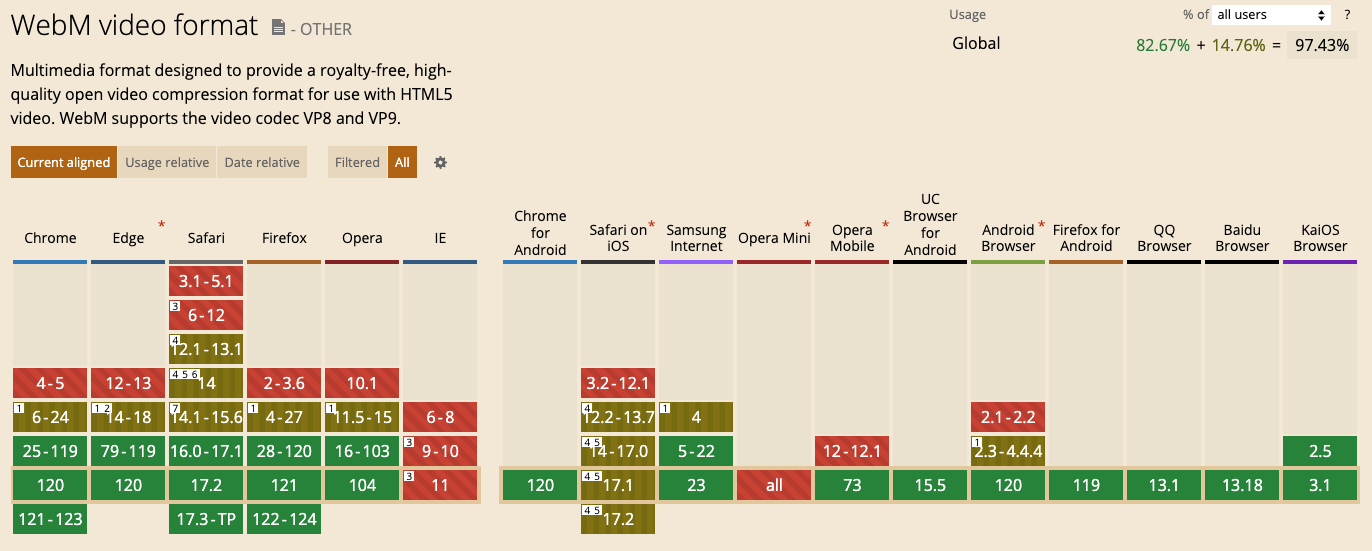
- WebM
- It has less browser support but is still commonly used as an option with the <video> tag for its benefits with video compression.
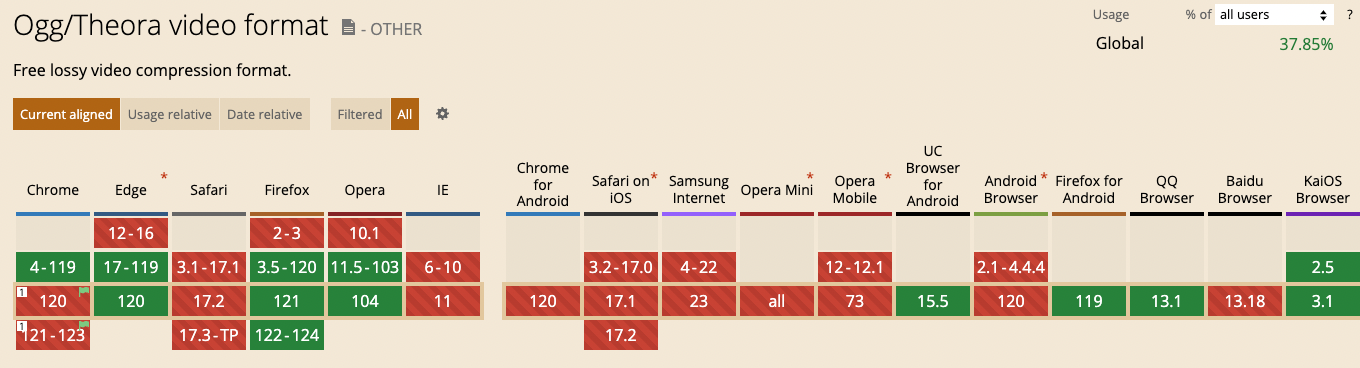
- Ogg (Theora):
- It is supported by browsers like Firefox, Chrome, and Opera but less universally supported than MP4.
What is an HTML5 video error, and how does it look in Chrome?
Viewers streaming in their preferred browser may experience an issue during playback. This could range from start-up errors like a black screen and loading icon continuously spinning to constant buffering and audio and video not being supported by the browser they are using. For Google Chrome, this is no different than any other major browser when encountering video playback errors. A way to understand what is happening with your video when being streamed is by using a video analytics solution. This will help give you insight into how it is performing, and an excellent example of this is Bitmovin’s Analytics.
Converting video to a specific HTML5-supported format
To ensure you provide a source for a video format supported by each browser, you can convert your file to one of the major formats listed above. The downside is that you will increase the storage needed to maintain these files, and they will still just be available in one specific quality, meaning there is a chance the playback will fail altogether if the viewer’s bandwidth is limited.
To highlight the bandwidth issue and the topic of converting a video file into a supported format, this is where adaptive streaming comes into play. As I mentioned earlier, if you want to enable ABR capabilities, you need to use HLS and MPEG-DASH streaming protocols, and with this, you’ll need an encoder like FFMpeg or Bitmovin’s VOD encoder. Also, check out our complete encoding guide to learn more about encoding.
HTML5 Video Attributes
HTML5 offers many attributes that can be set within the <video> tag and are essential for defining how the video behaves and appears on a webpage. These attributes provide significant control over how the video is played back and how it’s viewed, enhancing the user experience. However, the look and behavior of some attributes may vary across different user’s browsers and platforms. The most used HTML5 video attributes include
- Width and Height
- Define the size of the video player that will be streaming the content.
- Code example
- <video src=”movie.mp4″ width=”1920″ height=”1080″></video>
- <video src=”movie.mp4″ width=”1920″ height=”1080″></video>
- Controls
- When included, it displays the default video controls (play, pause, volume control, etc.) to the user.
- Code example
- <video src=”movie.mp4″ controls></video>
- <video src=”movie.mp4″ controls></video>
- SRC
- This specifies the source URL of the video file. This is a common shorthand version of using the source tags you have seen earlier, but it only allows you to specify one file format.
- Code example
- <video src=”movie.mp4″></video>
- <video src=”movie.mp4″></video>
- Autoplay:
- The autoplay attribute makes the video play automatically upon loading. However, the autoplay attribute is not always supported at the browser’s level
- Code Example
- <video src=”movie.mp4″ autoplay></video>
- <video src=”movie.mp4″ autoplay></video>
- Loop:
- If enabled, the video will start over again once finished.
- Code example
- <video src=”movie.mp4″ loop></video>
- <video src=”movie.mp4″ loop></video>
- Muted:
- This will mute the audio by default.
- Code example
- <video src=”movie.mp4″ autoplay muted></video>
- <video src=”movie.mp4″ autoplay muted></video>
- Preload (none, video metadata and auto)
- This instructs the browser to load the video when the page is loaded. It can have values like none (don’t preload), metadata (video duration, dimensions, etc.), and auto (preload the entire video).
- Code example
- <video src=”movie.mp4″ preload=”metadata”></video>
- <video src=”movie.mp4″ preload=”metadata”></video>
- Poster:
- This specifies an image to be shown while the video downloads or until the user hits the play button.
- Code example
- <video src=”movie.mp4″ poster=”thumbnail.jpg”></video>
- <video src=”movie.mp4″ poster=”thumbnail.jpg”></video>
- Playsinline
- This is mainly for iOS devices and indicates that the video should play on the webpage itself (inline) rather than opening in fullscreen.
- Code example
- <video src=”movie.mp4″ playsinline></video>
- <video src=”movie.mp4″ playsinline></video>
- AutoPictureinPicture
- This will direct the video to enter picture-in-picture mode in supported scenarios automatically
- Code Example
- <video src=”movie.mp4″ controls autoPictureInPicture></video>
Test out different player configurations with our Player playground to see how they fit with your use case, and learn about how you can improve your user experience further with the Bitmovin Player.
To see how this would look all together, here is an example:
<video width="1920" height="1080"
      loop
      muted
      autoplay
      poster="placeholder-image.jpg"
      Playsinline
      preload="auto"
      controls
      autoPictureInPicture>
   <source src="video.mp4" type="video/mp4">
   <source src="video.webm" type="video/webm">
   <source src="video.ogv" type="video/ogg">
   Your browser does not support the video tag.
</video>
Video Accessibility with HTML5
When providing content to a broad audience, you must cater to multiple types of viewers. This is where video accessibility with HTML5 is vital, as the settings used can make the content accessible to all users, including those with hearing, sight, or other disabilities. Additionally, this is very important for streaming platforms in the EU, as the EU Accessibility Act, which will go into law on June 28, 2025, will make it so that every platform that streams video needs to make them accessible for anyone disabled.
To implement this, you’ll need to insert the <track> tag that has multiple attributes, such as:
- SRC:
- As listed above, this specifies the source of the track file and or accessibility concerns. This is typically made available through a WebVTT (.vtt) file that contains the text track data.
- As listed above, this specifies the source of the track file and or accessibility concerns. This is typically made available through a WebVTT (.vtt) file that contains the text track data.
- Kind:
- This defines the type of text track utilized for this source. This can be subtitles, captions, and descriptions, which are vital for people who are blind or hard of hearing or don’t understand the spoken language well. Additionally, the track tag supports chapter breakdowns and metadata for non-accessibility use.
- This defines the type of text track utilized for this source. This can be subtitles, captions, and descriptions, which are vital for people who are blind or hard of hearing or don’t understand the spoken language well. Additionally, the track tag supports chapter breakdowns and metadata for non-accessibility use.
- SRClang:
- This sets the language of the track text data and should be a valid BCP 47 language tag.
- This sets the language of the track text data and should be a valid BCP 47 language tag.
- Label:
- This provides a readable title of the text track and enables the user to select between different items within the video player interface.
- This provides a readable title of the text track and enables the user to select between different items within the video player interface.
- Default:
- This setting makes it start by default unless the user’s preferences indicate something different.
An example of how this would look in the HTML document is:
<video controls>
   <source src="movie.mp4" type="video/mp4">
   <track src="subs_en.vtt" kind="subtitles" srclang="en" label="English" default>
   <track src="subs_fr.vtt" kind="subtitles" srclang="fr" label="French">
   <track src="captions_en.vtt" kind="captions" srclang="en" label="English Captions">
</video>
Here’s a breakdown of key elements for HTML5 video accessibility:
- Captions and Subtitles:
- This provides text alternatives for audio content, aiding users who are deaf or hard of hearing and is usually applied by listing WebVTT (.vtt) files.
- This provides text alternatives for audio content, aiding users who are deaf or hard of hearing and is usually applied by listing WebVTT (.vtt) files.
- Descriptions:
- This helps describe important spoken details in the video for users who are deaf or hard of hearing and can be included within the main subtitles but often are a separate track.
- This helps describe important spoken details in the video for users who are deaf or hard of hearing and can be included within the main subtitles but often are a separate track.
- Transcripts:
- This is a text version of the audio and visual content for users who need or want a text alternative. This would include the entire dialogue and describe every visible element.
- This is a text version of the audio and visual content for users who need or want a text alternative. This would include the entire dialogue and describe every visible element.
- Accessible Video Player:
- When viewing content, the controls must also be accessible, so setting the <controls> for the player experience is critical.
- When viewing content, the controls must also be accessible, so setting the <controls> for the player experience is critical.
- Control Video Playback:
- Allow users to control the video playback, including pausing, stopping, and adjusting volume.
- Allow users to control the video playback, including pausing, stopping, and adjusting volume.
- Language Identification:
- This will help your browser and player provide accurate language listings for captions, subtitles, or audio descriptions.
- This will help your browser and player provide accurate language listings for captions, subtitles, or audio descriptions.
- Fallback Content:
- Ensure your content plays back by providing alternative content for browsers not supporting HTML5 video.
An example of how this would look is:
<!DOCTYPE html>
<html lang="en">
<head>
    <title>Accessible HTML5 Video</title>
    <style>
        /* Optional: CSS for styling captions for better visibility */
        ::cue {
            background: rgba(0, 0, 0, 0.8);
            color: white;
            font-size: 1.2em;
        }
    </style>
</head>
<body>

<video id="myVideo" controls width="640" height="360" poster="thumbnail.jpg">
    <!-- Video sources -->
    <source src="example.mp4" type="video/mp4">
    <source src="example.webm" type="video/webm">

    <!-- Captions -->
    <track label="English captions" kind="captions" srclang="en" src="captions_en.vtt" default>

    <!-- Subtitles -->
    <track label="Spanish subtitles" kind="subtitles" srclang="es" src="subtitles_es.vtt">

    <!-- Descriptions (if separate text track) -->
    <track label="English Descriptions" kind="descriptions" srclang="en" src="description_en.vtt">

    <!-- Fallback content -->
    Your browser does not support HTML5 video. Here is a <a href="example.mp4">link to the video</a> instead.
</video>

</body>
</html>
This is how captions would look on the video player

An example of captions on a video player
Responsive video playback: optimizing for mobile and tablet viewing
Setting up the width and height attributes of the HTML5 video element is essential for completing your video’s dimensions. However, when it comes to ensuring your video content is responsive, meaning it fits the screen size when viewed across various devices, using static dimensions can be limiting.
For example, a video set at a specific size width might look great on a desktop, but if viewed on mobile or another device, it may be cut off (see image below).

Image of a non-responsive video
Example of a responsive video in HTML
This ultimately creates a poor viewing experience for the user. To tackle this, you’ll need to leverage CSS to boost your <video> element. For instance, setting the height to “auto” allows the video to maintain its original aspect ratio on different screen sizes, ensuring a consistent and optimal viewing experience.

Here’s how you can make your HTML5 video responsive:
- Use CSS for Fluid Dimensions
- Apply CSS styles to the <video> element, setting the width to 100% and height to auto. This allows the video to adapt to the width of its container while preserving its aspect ratio.
- Apply CSS styles to the <video> element, setting the width to 100% and height to auto. This allows the video to adapt to the width of its container while preserving its aspect ratio.
- Contain the Video in a Div
- Wrap your <video> element in a <div> and set the desired dimensions on the <div>. This method gives you more control, as the video will scale proportionally within the container.
By doing this, your video will be better suited for a range of devices, from large desktop monitors to smaller mobile screens, ensuring a user-friendly experience for all viewers.
In Conclusion
The HTML5 Video Element and tag have played a pivotal role in helping platforms stream video to viewers. With its functionality and customization capabilities through the HTML5 video attributes, you can deliver a better experience to your audience as we’ve provided the best practices for embedding video and ensuring accessibility over the web.
Whether you are just starting or are an experienced developer, the insights provided here should empower you to create more engaging, accessible, and cross-browser-compatible video content. Keep these principles in mind as you continue to explore the dynamic world of web video and multimedia.
Find out how our solutions can help you include ads within your streams by signing up for a free trial today.