
Practical Super-Resolution Deployments and Ensuing Results
Introduction
Welcome to Part 3 of Bitmovin’s Video Tech Deep Dive series: “Super-Resolution with Machine learning”.
Before you continuing with this post, I would highly recommend that you view the first two installments:
- Part 1 : Super-Resolution: What’s the buzz and why does it matter?
- Part 2 : Super-Resolution: Why is it good and how can you incorporate it?
However, if you would rather jump right into it, here is a quick summary:
- Spatially upsampling videos is a huge business opportunity.
- Super-Resolution (SR) is a class of techniques to spatially upsample videos.
- Machine Learning (ML) based SR methods are superior to the conventional SR methods.
- SR can be incorporated into your video workflow in several ways, and consequently, help you improve the end-user experience.
In this closing post, we explore:
- How to do practical super-resolution deployments in your video workflows?
- Which tools you should be using?
- Some real-life results from applying these practical deployments.
Practical Super-Resolution Deployments
So, we understand how ML-based super-resolution works in theory. But how is it actually deployed in practice?
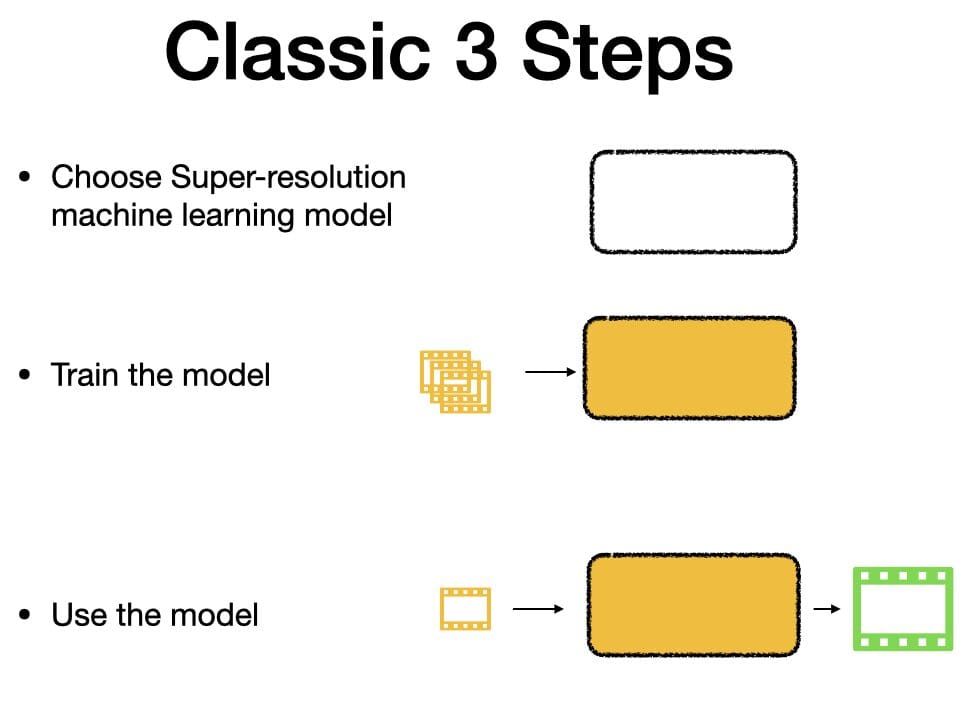
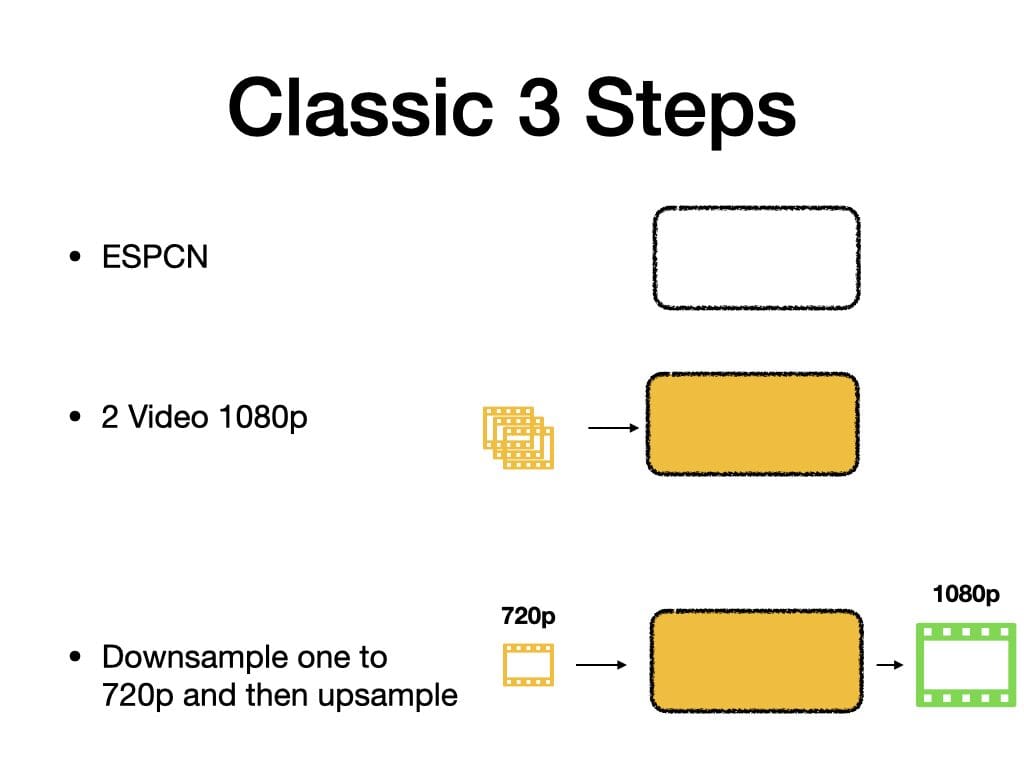
Classic 3-Step Playbook
It follows the classic 3 step playbook (This is by no means a comprehensive explanation of how ML models work. But rather a simplified representation of it to get a basic understanding), like any other ML-based deployments. You need to :
- Choose the right ML model
- Train the chosen ML model
- Use the trained ML model
Choosing a model
The first step is choosing the right model structure to train and deploy. The model you select will determine the level of tradeoff between computation complexity vs performance. For example, you can select a “complex” model that is hard to train in Step 2 but will give you great results in Step 3. Conversely, you could choose a “simpler” model that is easy to train but will give you comparatively worse performance.
This is similar to the tradeoff that you make when choosing different codecs. The tradeoff with codecs is defined by compression efficiency vs encoding complexity. There is no one “correct” model as it’s often determined by the particular use-case requirement.
Training the model
Once you’ve selected the right model for the specific project, you need to feed it with training data. In the case of super-resolution, the training data is a compilation of high-resolution videos and their corresponding low-resolution videos. The model is like an empty brain and the training data is its sensory inputs of the real world. Based on the training data, the model will learn how to upsample videos.
As you might have guessed, the choice of training data highly influences what a model learns. If you only feed it a particular type of content, say cartoon, it will perform exceptionally well in that particular type of content. But not so much for the other types of content. So, the training dataset has to be carefully chosen. Once the model is trained and learned, you can start deploying to actually upsample low-resolution videos.
Using the model
The last step is to use the newly-trained model in Step 2 to upsample videos by feeding in a low-resolution video and it will provide you with an upsampled high-resolution video.
Implementation of the model
Once you’ve selected an ML model, the next critical step is deciding how to actually implement the chosen model. This is similar to choosing a codec and its corresponding implementation in an encoding workflow :
- Selecting the codec (ex: HEVC, VP9, AV1) – this is the standard that will specify how the encoding should be applied
- The implementation of the codec – There are several implementation options for the same codec. In the case of HEVC (H.265), there is X265, Beamr-HEVC, Nvidia-Hardware-HEVC, among others. The difference between implementations could be either hardware or software-based. Furthermore, within the software, the implementation could be based on an open-source or closed-source build.
Similarly, when it comes to the super-resolution ML models, you could apply the same differentiating implementations for the same model, open-source vs closed-source and/or hardware-accelerated vs software-accelerated. For example, the academic SRCNN is an open-source and popular theoretical Super-Resolution ML model, and Waifu-2x is an open-sourced implementation of that model.
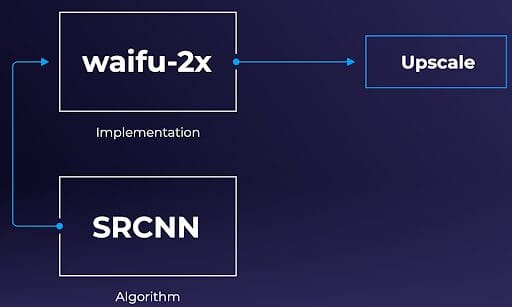
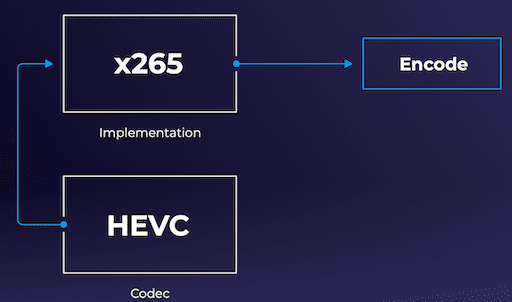
Codec and codec implementation (HEVC and x265) is analogous to the Super-Resolution ML model and its corresponding implementation (SRCNN and waifu-2x).
Codec and codec implementation (HEVC and x265) is analogous to the Super-Resolution ML model and its corresponding implementation (SRCNN and waifu-2x).Some popular open-source implementations of the Super-Resolution ML models are Waifu-2x, Anime-4k-CPP, and ACNet.
Super-Resolution Practical Results
In this section, we look at some of the results obtained from using an implementation of the Super-Resolution model. In the first section, we look at an implementation where we had to manually train the model. And in the next section, we will look at the implementation where we use a pre-trained model.
Manually Trained model
Methodology
In this section, we follow all the three steps laid out earlier in the Section “Classic 3-Step Playbook”. We use FFmpeg to do the testing. The following were the settings we used to perform an evaluation of super-resolution in FFmpeg
- Choose the model: We chose the Efficient Sub-Pixel Convolutional Neural Network model (SRCNN).
- Train the model: We used two 1080p sample videos to create the model that was fed into Ffmpeg.
- Use the model: Once the model is ready, we can use it to upsample any video.
To test the performance of the super-resolution upsampling method in a real video workflow, we selected a 720p video as input. The input video was upscaled and transcoded using H.264 with high encoding settings and at different bitrates. To determine the effectiveness of the super-resolution method, we ran the test using the traditional bicubic method first, for control.
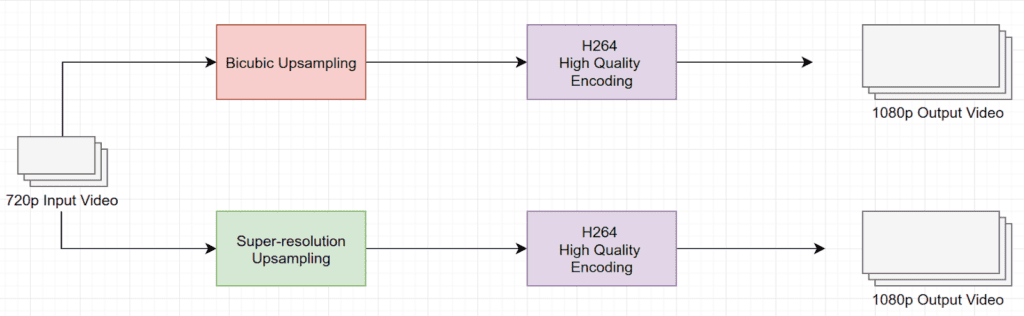
Once we had the results of both upsamples, I compared the final output quality against the input quality using the VMAF quality metric. The result is shown in the following figure.
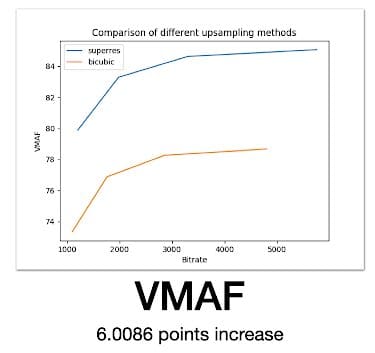
Results
We observe that on average there is a 6 point difference in VMAF. If you are in the video field, you will realize that is a pretty significant gain in video quality.
Admittedly, this is not a scientific evaluation of the upsampling methods and also not a fair comparison. Because we used only two videos to train the model. And we fed in a similar type of low-resolution video for super-resolution upsampling. So the experiment is highly rigged towards the super-resolution method.
Nevertheless, this goes on to show the superiority of the super-resolution methods compared to the traditional upsampling method. This was more of a test-grade result. In the next section, we will look at the production-grade result.
If you are an engineer/developer and want to try your hand at the aforementioned steps, then you are in luck. The popular multimedia tool FFmpeg has supported super-resolution as an inbuilt video filter, since version 4.2.
Pre-Trained Model
It’s important to note that steps one and two from the “Classic 3-step playbook” are not always mandatory when using machine-learning. In some cases, it’s possible that the best performing and most appropriate models have already been chosen and trained. In the case of super-resolution, there are plenty of models publicly available for upsampling anime content that has been trained using larger data sets and also proven to work well. Therefore, you don’t need to concern yourself with the burden of manually training your own models. In this scenario, you could simply plug the existing model into your production workflow model and “turn on” super-resolution.
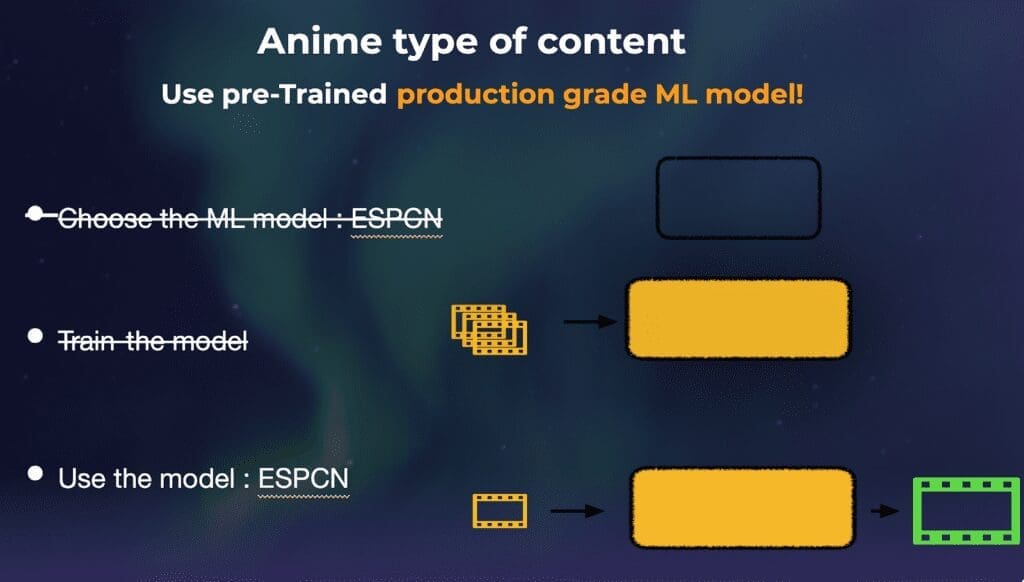
For our second super-resolution deployment test, we chose the popular Waifu2x implementation with a pre-trained model to do some production-grade testing for a very popular (but old) anime series. Given that this model is a perfect fit for upsampling anime-style art, we selected production assets that are old, low-resolution, and noisy.

We feed them through the pre-trained model and the results of our test can be viewed below:
[Rich_Web_Slider id=”1″]
As you can see from the results above, the video upsampled using the super-resolution is significantly better than the conventional upsampling methods. The details in the boundary are crisper, the blurred artifacts are reduced, among other things.
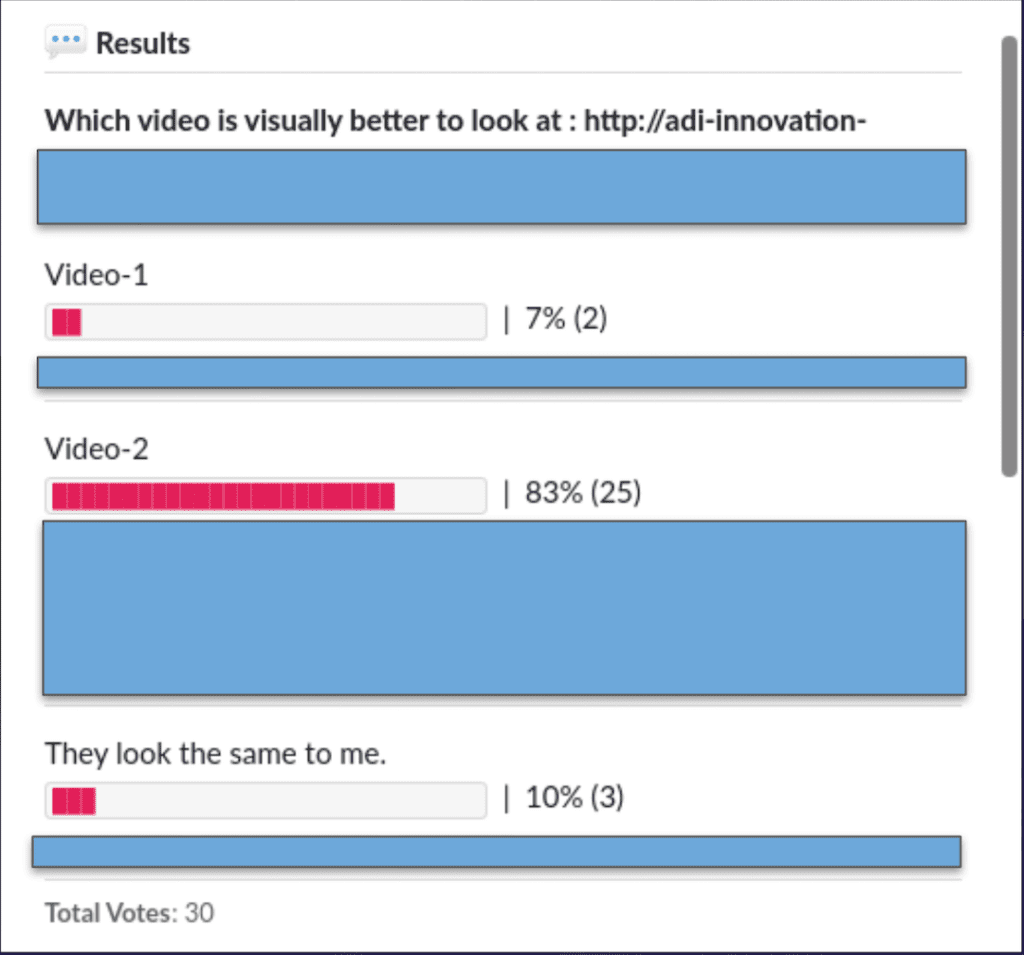
Since we did not have a high-resolution video for reference, we could not compute an objective quality metric (VMAF). Nevertheless, we applied subjective quality testing by playing the two videos, conventionally vs super-resolution upsampled, and asked the viewers to vote on which video looked better. 83% of the viewers voted that the super-resolution upsampled video looks better.
These results are “super” encouraging for the future of upsampling content with machine learning, new models don’t always need to be picked and trained. Even for certain specific production use-cases, one could use pre-trained models, and obtain superior results compared to the traditional methods. One could reasonably believe that super-resolution models can be applied for many new variations of use cases.
Conclusion
As we’ve learned throughout this series, super-resolution with machine learning is a huge business opportunity, especially with the exponential rise of 4K (and higher) resolution consumer devices and the count of streaming services. Given that many content owners have massive backlog libraries of standard quality content, upsampling will be a great method of re-engaging an older audience and introducing new viewers to older content. Super-resolution, one of a few types of upsampling methods can be best applied using machine learning mechanics that will further improve quality over time. However, much like a classic encoding workflow, there are countless ways to implement an ML-based super-resolution upsample – and finding the balance of existing models versus new models will ultimately help improve the end-user experience.
Did you enjoy this post? Check out the following content:
Part one of the Super-Resolution series: What’s the buzz and why does it matter?
Part two: Why is it good and how can you incorporate it?
View my comparison test of Bicubic vs Super-Resolution content here