
It is that time of the quarter again at Bitmovin, Hackathon time. Our Hackathon includes two days of hacking solutions together before presenting the results to the wider business. Every programmer loves it and even more when your team is winning. During this Hackathon, we decided to step out of our backend-comfort zone and tinker a bit with UI.
To be more specific, we tried to write an android app that would serve as an RTMP input source for a live stream.
Setting up an RTMP input can be lengthy, especially when there is no computer with FFmpeg at hand. And syndetic input can be boring at times. So why not use a live feed from your mobile device for this? My go-to tool to create an RTMP stream is FFmpeg so let’s try to use this in android. We quickly realized that that was a futile endeavor, especially in two days. So we did what any software developer would do and looked for a library that had been written by somebody smarter than us. We tried a few libraries like the Larix Broadcaster SDK or some small GitHub repositories like the LiveVideoBroadcaster but weren’t able to get any of these to work in the limited time we had. Finally, a bit more searching revealed the grail we had been looking for; we unearthed this library and managed to get something running.
How to use it
The library creates a very handy OpenGLView that lets you show the camera in your activity. If you’d like to follow along with the steps we took, then to start, simply add it to your XML config like this:
<com.pedro.rtplibrary.view.OpenGlView
    android:layout_width="0dp"
    android:layout_height="0dp"
    app:layout_constraintBottom_toBottomOf="parent"
    app:layout_constraintEnd_toEndOf="parent"
    app:layout_constraintStart_toStartOf="parent"
    app:layout_constraintTop_toTopOf="parent"
    android:id="@+id/surfaceView"
    app:keepAspectRatio="true"
    app:aspectRatioMode="fill"
    app:AAEnabled="false"
    app:numFilters="2"
    app:isFlipHorizontal="false"
    app:isFlipVertical="false"
    />
The corresponding code will need an OpenGlView object as well as a RtmpCamera object. Let’s go ahead and create those:
private RtmpCamera2 rtmpCamera;
private OpenGlView openGlView;
Those elements also need some values assigned, and we used the onCreate method for that:
this.openGlView = findViewById(R.id.surfaceView);
this.rtmpCamera = new RtmpCamera2(openGlView, this);
this.openGlView.getHolder().addCallback(this);
Starting an RTMP stream
As all of the necessary configurations were complete, we just have to start the RTMP stream. To do that, the only thing we need to add to the code below (how to obtain that will be shown later).
@Override
public void startStreaming() {
   runOnUiThread(() -> {
       if (!rtmpCamera.isStreaming()) {
           if (rtmpCamera.isRecording()
                   || rtmpCamera.prepareAudio() &&                      rtmpCamera.prepareVideo()) {
               rtmpCamera.startStream("URL to you live stream");
               setStateStreamIsRunning();
           } else {
               this.toastError( "Error preparing stream, This device cant do it");
           }
       } else {
           rtmpCamera.stopStream();
       }
   });
}
We used a separate thread and a callback for that. That is why there is a runOnUiThread, but if you start the RTMP stream from your activity, you will not need that.
The RTMP URL can be set here rtmpCamera.startStream("URL to you live stream");
Setting up the live stream encoder
For our encoder, we used the simple API https://bitmovin.com/docs/encoding/articles/simple-encoding-api-live, so we needed minimal configuration to get the live stream up and running. We used the CDN https://bitmovin.com/docs/encoding/articles/bitmovin-cdn-output output as well because it would work out of the box.
To get this going, the first thing to set up is the input:
private SimpleEncodingLiveJobResponse setUpLiveStream() {
   SimpleEncodingLiveJobInput input = new SimpleEncodingLiveJobInput();
   input.setInputType(SimpleEncodingLiveJobInputType.RTMP);
   SimpleEncodingLiveJobRequest job = new SimpleEncodingLiveJobRequest();
   SimpleEncodingLiveJobCdnOutput outputUrl = givenCdnOutputWithFullHDResolution();
Next is the output. In the spirit of the hackathon, we used a CND because of the minimal configuration, which you can set up like this:
private SimpleEncodingLiveJobCdnOutput givenCdnOutputWithFullHDResolution() {
   SimpleEncodingLiveJobCdnOutput output = new SimpleEncodingLiveJobCdnOutput();
   output.setMaxResolution(SimpleEncodingLiveMaxResolution.FULL_HD);
   return output;
}
Now only some minor configurations are left.
   job.setInput(input);
   job.addOutputsItem(outputUrl);
   job.setCloudRegion(SimpleEncodingLiveCloudRegion.EUROPE);
   job.setName("Android app live stream");
   return bitmovinApi.encoding.simple.jobs.live.create(job);
}
Finishing touches
A live stream takes a bit of time to be ready. in the essence of time, we swiftly did a very ugly “busy waiting” loop to wait until the live stream was done with the setup. To improve this, we have left it as an exercise for the reader.
public boolean setupLiveStreamAndWaitForRunningState(Callback cb) {
   this.stopped = false;
   this.encodingId = null;
   SimpleEncodingLiveJobResponse jobResponse = setUpLiveStream();
   try {
       while (!readyForIngestOrFailed(jobResponse) && !stopped) {

           Thread.sleep(300);
           jobResponse = bitmovinApi.encoding.simple.jobs.live.get(jobResponse.getId());
           if (jobResponse.getEncodingId() != null && this.encodingId == null) {
               this.encodingId = jobResponse.getEncodingId();
           }
           cb.reportStatus(jobResponse.getStatus().toString());
       }
   } catch (Exception e) {
       cb.toastError(e.getMessage());
   }
   if (this.stopped || this.encodingId == null || this.encodingId.isEmpty())
   {
       return false;
   }
   cb.startStreaming();
   this.rtmpUrl = String.format("rtmp://%s/live/%s", jobResponse.getEncoderIp(), jobResponse.getStreamKey());
   return true;
}
To retrieve the RTMP URL that needs to be inserted into the code, get it by using:
this.rtmpUrl =
String.format("rtmp://%s/live/%s", jobResponse.getEncoderIp(),
jobResponse.getStreamKey());
We had to run this in a separate thread because you cannot have HTTP requests in the UI thread in android, and it would not be a good user experience anyway.
Once the hard part was done, we spent the second day of the hackathon refining the app and making the UI better and even got some much-appreciated help from one of the Bitmovin UX designers.
Wrapping up
As the hackathon drew to a close, the competition was fierce, with great projects submitted by other teams. However, in the end, all of the efforts paid off, as our team won first place!
Here are a couple of images of how the live stream worked on an Android phone:
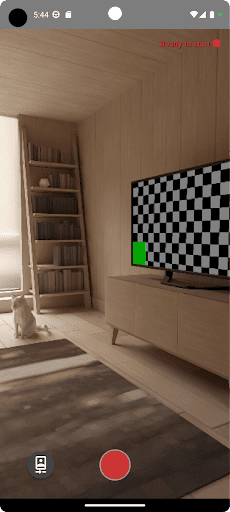
Visual of stream interface pre-live
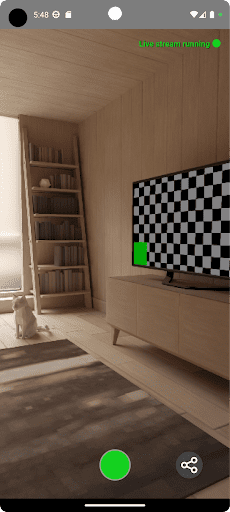
Visual of active live stream
Additionally, if this project was interesting to you and you’re currently looking to test your streaming application across Android, iOS, or any other platform/device, check out our 30-day free trial where you can test the Bitmovin Live and VOD Encoder, Player or any of our other SaaS solutions completely free with no commitment.