Most Video Players are web-based applications, specifically those built on Web SDKs (any others are typically native to a given device) that allow you to stream your video files over the internet. Each Video Player has varying qualities that distinguish them from their counterparts. The Bitmovin Video Player stands out due to its qualities and configuration settings that make it easy to set up. These factors, among others, make it an advanced media player. A step up from the standard HTML5 video player, advanced media players provide you with the flexibility and control to stream your video assets in a customizable environment that delivers a quality viewing experience for your audience.
This article will teach you more about the benefits of advanced video players and provide a step-by-step tutorial on how to set up and configure the Bitmovin video player on your HTML5 web page. Let’s get started.
Features of an Advanced Video Player vs HTML5 Video Player
First, let’s explore some of the attributes that give an advanced video player an edge over the standard HTML5 video player. These include:
- More functionality
- More customizability
- Better performance
- DRM support
- Greater user experience
More Functionality
If you’ve worked with the basic HTML5 video player, you’ll know it does not have the functionality that most advanced video players possess, such as:
- Support for all devices, including Smart TVs
- Adapting to the optimal quality based on the user’s internet connection
- Monetisation options through advertising
With an advanced HTML5 video player, these functionalities and more are at your fingertips.
More Customizability
Customizability is interwoven with functionality. When a player has more functionality, it gives room for more customizability, such as the ability to add analytics or advertising options.
Better Performance
Some of your users will have high-end devices, and others, not so much. An advanced video player can deliver the best possible experience for your users based on their own unique device qualities.
This means, for your users with high-end devices (and good internet connection), they’ll get the best possible experience, while others will still get the media files but in a lower quality. In the end, it’s a win-win situation. It is important to note, however, that quality is also dependent on the Player’s selected Encoder pushing out multiple bitrates, thus the Player can (and will) adjust to the best available bitrate.
DRM Support
Digital Rights Management (DRM) exists to curb piracy of digital files, which includes video files. However, some of your users may have video grabbers installed on their systems. An advanced video player with DRM support will send an approved key to the license server, whereby a CDN will deliver the content and the player will decrypt the stream to make it viewable for a valid user.
Applying DRM support will ensure that the player/device that is requesting that stream is the one that should be playing it and is not being played on any other player that does not have the key to get the CDN to release the content.
Great User Experience
An advanced video player, similar to what you’ll find on YouTube, has great functionalities designed to suit the user’s experience.
An example is the “Theater Mode” feature, which expands the video viewing section to fill the current browser’s viewport. Some of the best player solutions have native support for a multitude of devices, like Smart TVs, especially in today’s market where thousands of unique devices exist. And best of all, advanced video players will focus on quality by delivering a customized UI by device type, that gives the end consumer more features to engage with.
Implementing Bitmovin Video Player
Now, let’s dive into the details to transition from your standard HTML5 video player. Bitmovin provides an array of options that will get your advanced Video Player working on your website in no time at all.
Before you get started, you’ll need a Bitmovin Player license that will work with your domain. While you can use the Video Player freely on `localhost` (your machine), you need a player license to use it on another server.
Configure The Bitmovin Player License
First, sign up for an account at Bitmovin. Upon successful sign-up, click on the Player collapsible and then select Licenses.
On the Licenses page, you’ll be presented with your player license key.
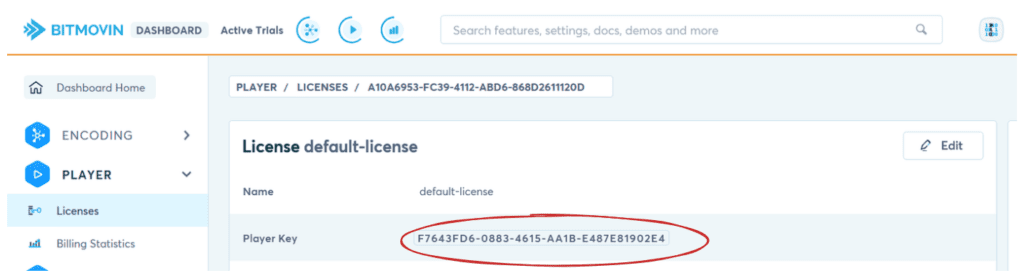
Copy the license key and place it somewhere easily accessible. You’ll need it later for the player configuration.
Next, you need to set the domains that can use the license.
Go back to your Licenses page. Scroll down the page and locate the section titled Domains / Package Names / Bundle Identifiers under Add Domains / Package Names / Bundle Identifiers. Add your domain name and click on the Add button.
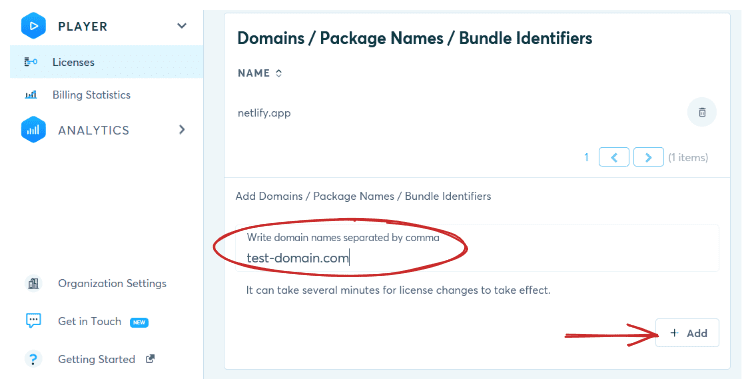
With that, you are all set. The player will work with your license and allowed domains.
Add Bitmovin Player SDK
The Web SDK allows you to implement the Bitmovin video player on your HTML5 web page. It exists in the following forms:
- CDN version
- Modular version
- Via npm
This article will explore how to use the CDN version because it is beginner-friendly and only requires one line of code in the `<head>` tag of your HTML5 web page.
If you’d like to follow along, create a basic HTML5 web page somewhere on your website or a local web server (`localhost`). The Bitmovin player will not work with the `file://` protocol.
Next, type the following code block into the HTML5 web page.
```html
<!DOCTYPE html>
<html lang="en">
<head>
  <title>Bitmovin Demo</title>
  <meta charset="UTF-8"/>
  <meta http-equiv="X-UA-Compatible" content="IE=edge,chrome=1">
  <meta name="viewport" content="width=device-width, initial-scale=1.0">
</head>
<body>
</body>
</html>
```
Locate the `<head>`section of your web page and add the following script tag within it.
```html
<head>
<script src="https://cdn.bitmovin.com/player/web/8/bitmovinplayer.js" type="text/javascript"></script>
</head>
```
This will pull the Bitmovin player from the CDN and make it available for use on your web page. The remaining steps depend on you having this player included in the `<head>` of your document.
Embed The Bitmovin Player
The SDK requires a specific location on your web page where it will render the player’s components and the video. It is recommended that you use an HTML element with a unique HTML ID.
```html
<body>
<div id="my-player"></div>
</body>
```
Without this line of code (or something similar), the SDK will have no idea where you want the player on your web page and the player will not work.
Configure the Bitmovin Player
The Bitmovin Player configuration is essential because it allows you to dictate the behavior and appearance of the player. You’ll write the configuration setting in JavaScript.
This means you have 2 options to configure the player. These options are:
- A script tag in the `<head>` element
- A linked JavaScript file
For this tutorial, you’ll opt for the first.
Create a script tag in your HTML document before the closing `<body>` tag.
Within this script tag, write the following code block. Do not forget to replace the license key with your license key.
```js
// Configure and Initialize the player
var playerConfig = {
  // Replace the key value with your Bitmovin
  // license
  "key": "f7643fd6-0883-4615-aa1b-e487e81902e4",
  "playback": {
"muted": true,
  },
  style : {
   // If you need to override styles like
   // width, write it in CSS with the !important
   // keyword.
width: '100%',
aspectratio: '4:3',
  }
}
```
Here is a quick explanation of the above configuration settings:
- `key`: The player license key
- playback`: The player default behavior on initial page load
- `style`: CSS styles that dictate the player’s appearance in the web browser’s viewport
You can check the Bitmovin docs for the full list of player configurations.
Initialize the Bitmovin Player
The player initialization depends on 2 things:
- A valid HTML container for the player
- A player configuration setting
Include the following code block below the player configuration in the script tag.
```js
// Initialise the player
var playerContainer = document.getElementById('my-player');
var player = new bitmovin.player.Player(playerContainer, playerConfig);
```
You’ll need this step to load the player’s source configuration.
Configure the Source of the Bitmovin Player
The source configuration of the player allows you to do the following, among others:
- Specify the player’s title
- Include a description of the video
- Include a video poster
- Configure DRM settings
- Specify the streaming protocols
Speaking of streaming protocols, at the time of writing this article, Bitmovin supports:
- DASH: Dynamic Adaptive Streaming on HTTP
- HLS: HTTP Live Streaming
- Smooth Streaming (HSS): An HTTP progressive download that delivers videos in chunks and caches them closer to the user for faster delivery
Additionally, you can also stream by Progressive Download:
This is when a video file is transmitted over the internet as one video file, but its quality can be modified based on the user’s need. Often a MPEG-4, but can be in a variety of other video formats.
Here are some of the video formats supported by Bitmovin:
- WebM
- MOV
- MPEG2-TS
You can check the full list of supported input and output formats in the Bitmovin docs.
Now, place the following code snippet below the player initialization settings in the script tag.
```js
var sourceConfig = {
  "title": "Bitmovin Player Demo",
  "description": "A Demo on how to replace the standard HTML5 Video player",
  // Testing URLs from Bitmovin Web SDK documentation: https://bitmovin.com/docs/player/getting-started/web
  "dash": "https://bitmovin-a.akamaihd.net/content/MI201109210084_1/mpds/f08e80da-bf1d-4e3d-8899-f0f6155f6efa.mpd",
  "hls": "https://bitmovin-a.akamaihd.net/content/MI201109210084_1/m3u8s/f08e80da-bf1d-4e3d-8899-f0f6155f6efa.m3u8",
  "smooth": "https://test.playready.microsoft.com/smoothstreaming/SSWSS720H264/SuperSpeedway_720.ism/manifest",
  "progressive": "https://bitmovin-a.akamaihd.net/content/MI201109210084_1/MI201109210084_mpeg-4_hd_high_1080p25_10mbits.mp4",
  "poster": "https://bitmovin-a.akamaihd.net/content/MI201109210084_1/poster.jpg",
}
```
You can get free DASH testing URLs on OTTVerse as well as free HLS m3u8 testing URLs.
Load the Source Config of Bitmovin Player
You need to load the player using a `load` method available in the player instance created in the “Initialize The Bitmovin Player” step above. If not, you’ll get a blank player with a non-functional play button.
```js
player.load(sourceConfig).then(function() {
console.log('Source Configuration is ready for use');
  }).catch(function(reason) {
console.log('Source Configuration not ready:', reason);
  }
);
```
This completes the setup. You can check the demo’s code on GitHub and a live version online.
Conclusion
In this article, you learned about the capabilities and features of an advanced HTML5 video player, as well as how to replace an HTML5 video player with a Bitmovin video player.
Bitmovin delivers a great viewing experience. They are truly leaders in their field, trusted by the likes of BBC and Discovery Channel, among other noteworthy networks.
Try out Bitmovin’s advanced HTML5 Video Player for yourself here